This guide covers how to create a beauty blog and/or makeup website from scratch. It will be a website/blog that you own and control – one that’s not controlled by any service and that lives on your own domain (aka web address).
We’ll walk through how to build everything 100% from scratch, so that you can get up and running with no previous knowledge necessary.
We’ll build using WordPress as the software that “powers” your beauty website. You may have heard of WordPress as a strictly blogging platform. It started out as a blogging platform. Over the years it has become a versatile “content management system.”
A content management system gives you an administrative area to create, edit and manage all your website content. Oh – also, WordPress is free and “open-source” which means it’s maintained by a dedicated community, and not a giant corporation.
What that means for you: a “website” and a “blog” are really the same thing. A blog is just the part of your website that lists new content in reverse chronological order. By using WordPress, you’ll not only have a blog, you’ll also be able to expand and customize everything as your website grows.
Before we dive in though, here’s what we’ll cover. First, we’ll cover getting a domain name (what people will type in to access your website) and getting hosting (the server that will “serve” your website to whoever visits).
Second, we’ll install WordPress (again, the free software that will “power” your website).
Third, we’ll go through installing some plugins that will add functionality specific to makeup and beauty websites – hint: Pinterest 😉
Fourth, we’ll run through additional resources to get that beauty website design and look you & your readers want.
Let’s dive into setting up your beauty website!
Getting Started – Setting Up Your Beauty Website
Your first step for setting up a beauty or makeup website is to get a custom domain name (ie, your web address) pointed to a hosting account (ie, where your website lives); then to install WordPress on your hosting account so that you can log in, set it up and customize it.
Start by navigating to a domain registrar like Namecheap (my recommendation) or GoDaddy to buy a domain. GoDaddy usually runs a promo at this link and Namecheap usually offers a free bonus promo at this link.
*Note – you can ignore any upsells or offers of hosting. Just buy your domain name. I recommend buying domains and hosting separately. There are several reasons, but in general, if you’re really good at one, then you’re not so good at another. It’s like trying to get a McDonald’s Egg McMuffin at Starbucks. Or Starbucks coffee at McDonald’s.
Either way, now you need to buy hosting. Don’t be daunted. It’s not super-expensive at all. It’s the one investment you need to make in your website to make it “yours” so that you control it (and can make money from it). This is the key difference between a self-hosted WordPress and a “blogging website” like WordPress.com or Blogger. Your website will be on your server to run how you want.
To start, you just need “Shared Linux Hosting” to run WordPress.
Choosing a good web hosting company is critical for your website. Web hosting companies tend to make things way too confusing with useless feature overload, short-term discounts (then expensive long-term prices), and over-promising customer service.
There at hundreds of web hosting companies on the Internet. There is no such thing as an “overall best” – only the best for you & your situation. Since you are reading this guide, I’ll make a few assumptions (ie, performance needs, budget parameters, etc).
Otherwise, here are the 3 companies that I usually end up recommending to DIYers setting up a beauty website. You can also read my full hosting reviews, including ones for HostGator, InMotion & Web Hosting Hub if you’re interested.
- HostGator – Very affordable all-around plans, especially if you plan on installing many small WordPress websites. Good customer service & performance. I use them for my smaller, personal sites. See their plans w/ 45% off.
- Web Hosting Hub – Independently-owned with beginner-focused customer service. Very well-priced plans with deep long-term discounts and good performance. See their plans w/ current discount.
- InMotion Hosting – Independently-owned with great customer service & 90 day money back guarantee. Well-priced plans (with some caps) that have great performance, and can grow as your site grows. This site actually uses a hosting plan with them. I’ll also use their site for screenshots. See their plans w/ 53% off discount here.
The purchase & setup steps in this guide work for all three companies mentioned (and others), but will come from InMotion Hosting if you want to follow along exactly. HostGator has a few more ads/upsells but is otherwise the same. Web Hosting Hub is almost exactly the same.
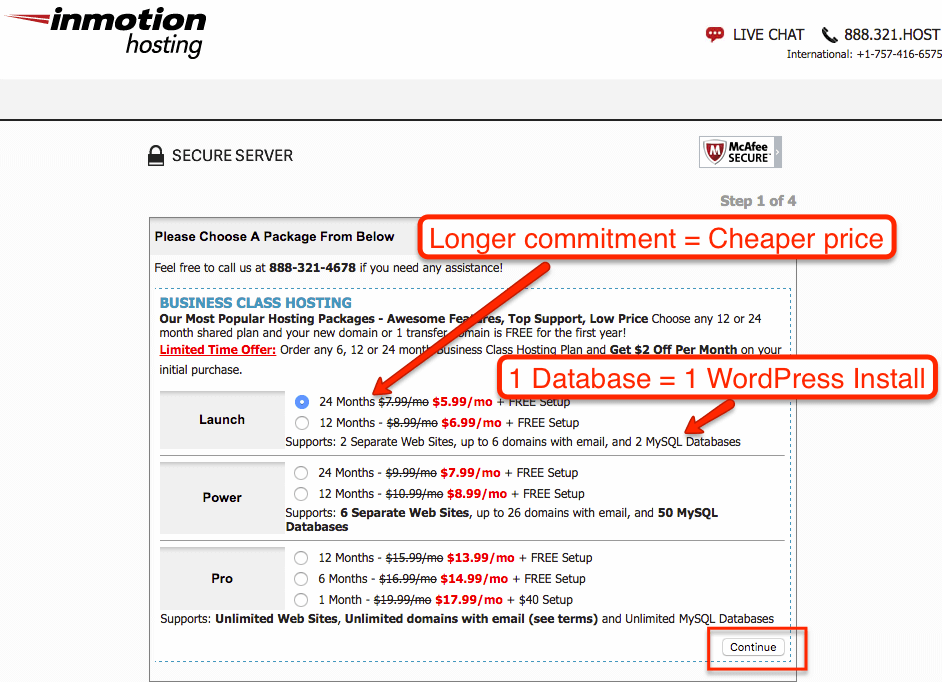
Step 1. Choose the hosting plan that fits your current goals.
Go to InMotion Hosting’s plans, and view their ‘Shared Business Hosting Plans’. Then select the plan you want. The Launch Plan is great if you have just one or two website ideas. The Power Plan is good if you have several you want to run, plus maybe some test websites on subdomains. The Pro Plan is good if you want no limits.
Next, fill in your domain name and continue.
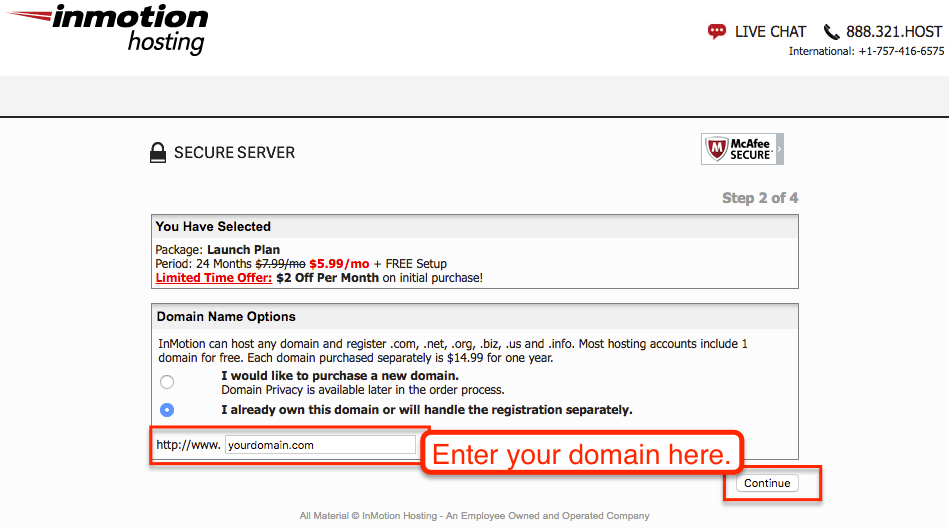
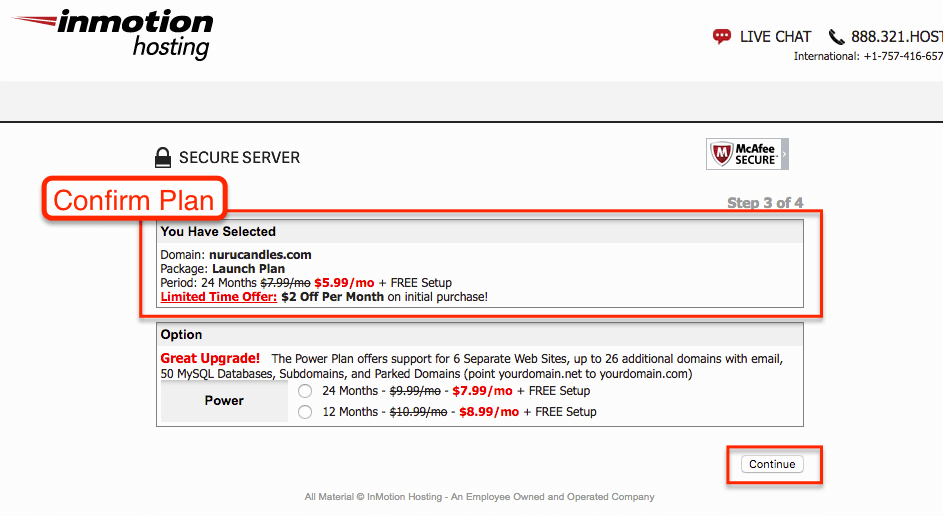
Step 2. Purchase your plan & select your hosting options.
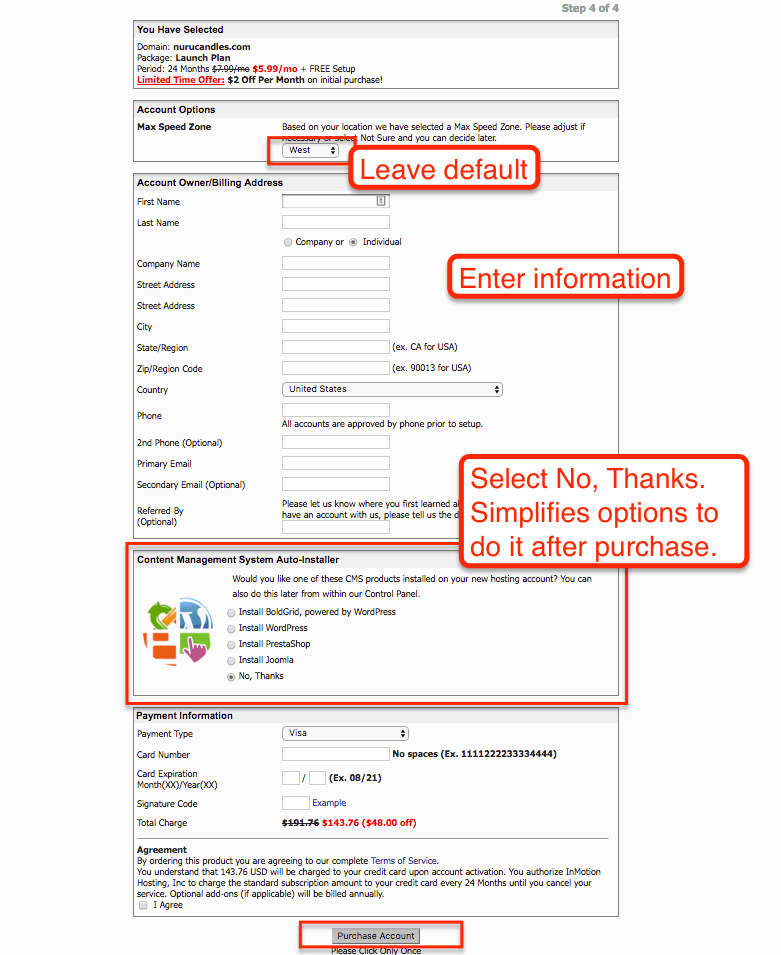
Confirm your plan and fill in the checkout page fields. The Max Speed Zone determines whether your website physically lives in California or Virginia (which can shave a little bit when you are updating the site), but the default selection should be correct.
The Content Management Installer can be useful, but I’ve found it better to select “No, Thanks” and install it after purchasing the hosting product (which we’ll be doing).
Step 3. Access your account & technical details.
It takes a couple of minutes for your account to get ready. When it’s ready, you will get an email from InMotion Hosting that looks like this…
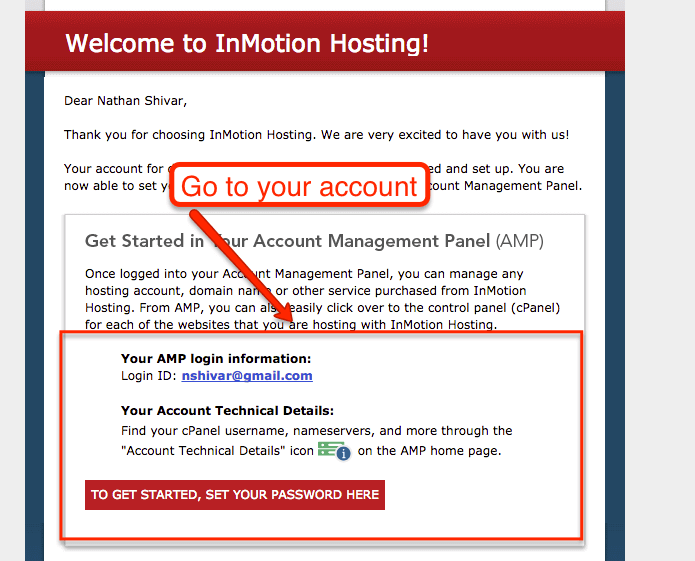
Once you are in your account management panel, head to the Account Technical Details.
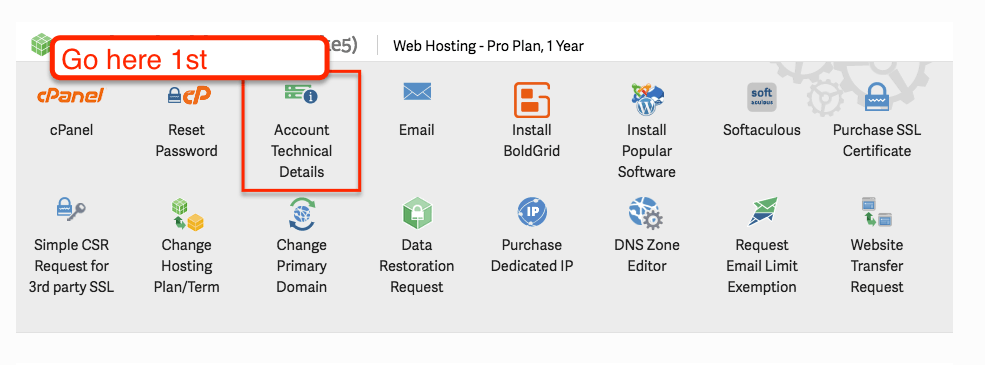
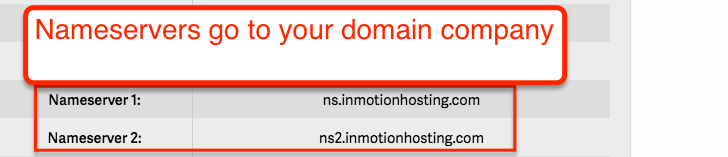
Scroll down, and you’ll see two “Nameservers” – copy them. These will “connect” your domain name to your hosting server.
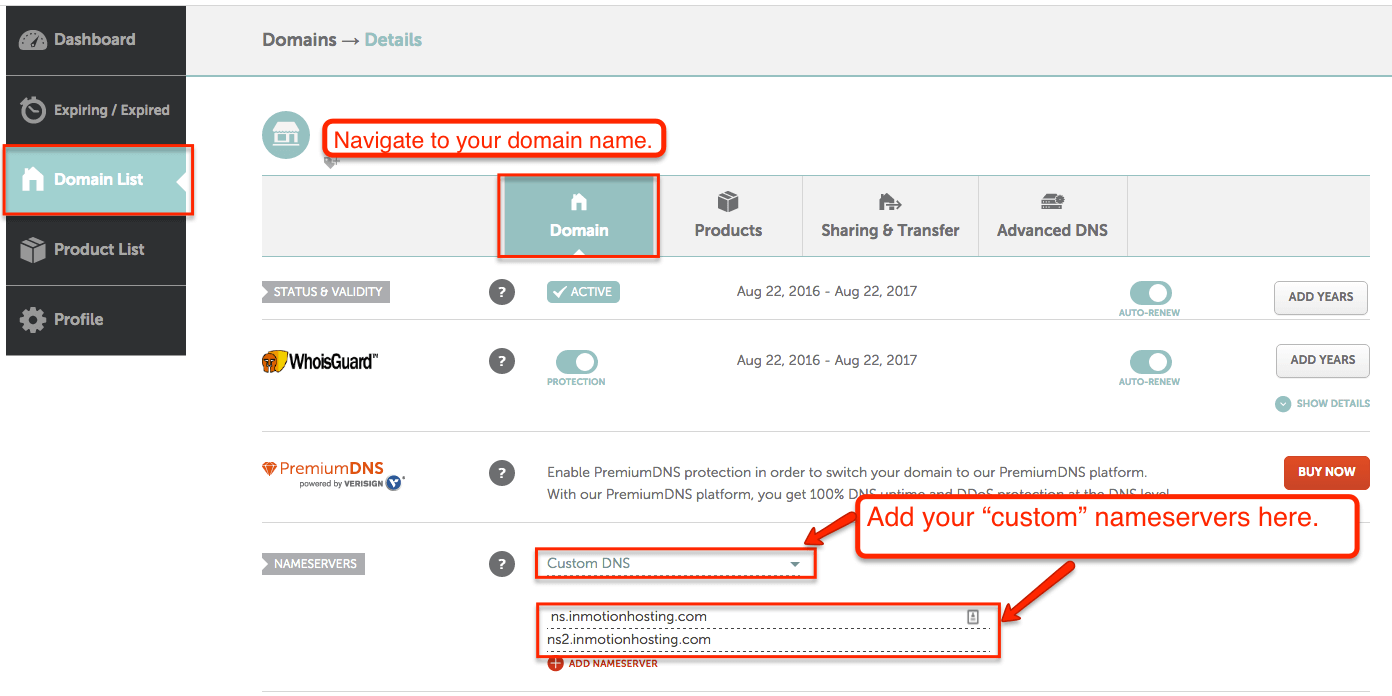
Step 4. Add Nameservers to your domain name & confirm the connection.
Copy the 1st and 2nd Nameserver, and go log in to where you bought your domain names. Then navigate to your Domain’s DNS area. Then, replace the current DNS with the ones provided by HostGator.
In GoDaddy: Go to My Account –> Launch Domains –> Manage Domain –> select Set Nameservers –> Select ‘I have custom nameservers’ –> Paste in 1st and 2nd Nameserver provided by InMotion.
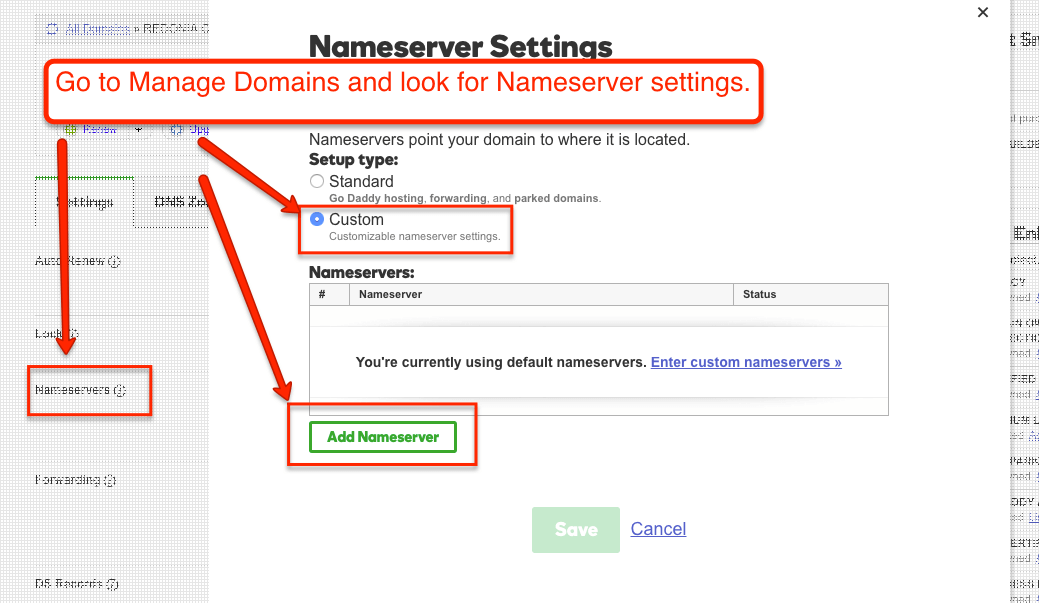
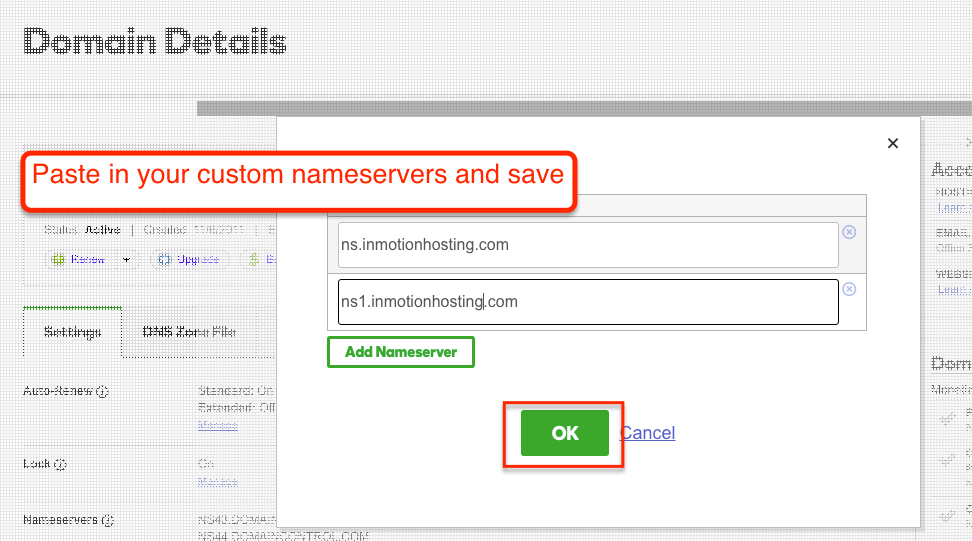
In Namecheap, Login –> Manage Domains –> Select Domain –> Select Manage –> Under NameServers, select Custom and place your nameservers there –> Save Changes.
That’s how to set up hosting for your beauty website! Now all that remains is to Install WordPress, which we will cover in the next section. It can take up to 24 hours for the Domain Nameservers (DNS) to switch over completely, but it usually goes fairly quickly (usually less than 10 minutes if you’re in the USA).
How To Install and Configure Blog Software
So now that we have an address and a place for our website to live, we can dive into how to set up a WordPress website on the server. WordPress is going to be the software that powers your website. But before it can power your website – it needs to be installed on your hosting server.
Here’s how to install and configure WordPress…
Installing WordPress With QuickInstall
While you can certainly install WordPress manually, InMotion (and others mentioned) has an excellent, free, secure tool to quickly install WordPress onto your new hosting account.
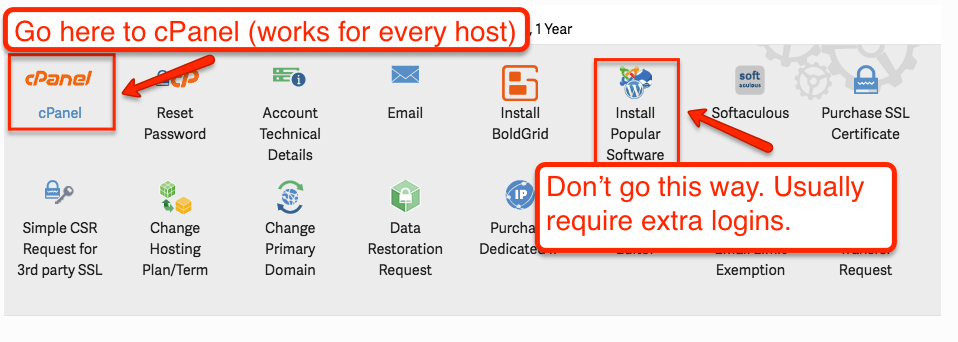
Step 1. Access your hosting control panel (cPanel).
Head back to your InMotion Account Management Panel. Click the link to go to your cPanel (control panel). It should automatically log you in to cPanel.
And yes, there is a link to “Install Popular Software” – that link just ends up going to cPanel anyway through a different login screen. Easier to go directly to cPanel.
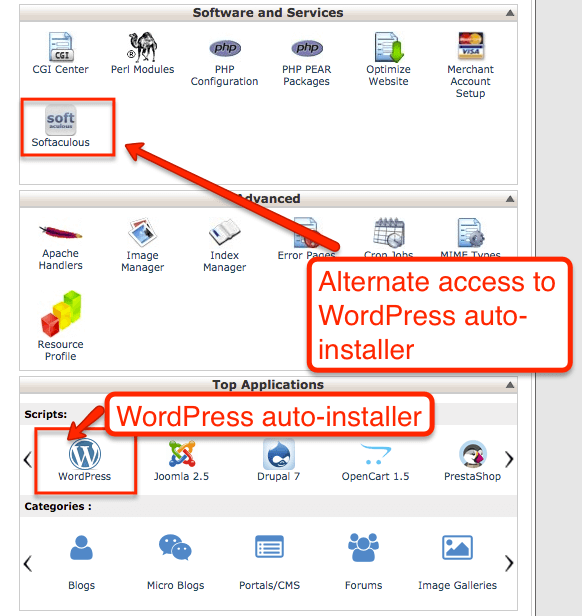
Step 2. Find the WordPress installer script.
Now that you are logged into hosting cPanel – you’ll need to go looking for an icon called “WordPress” and/or “Softaculous” and open it. You’re looking for this:
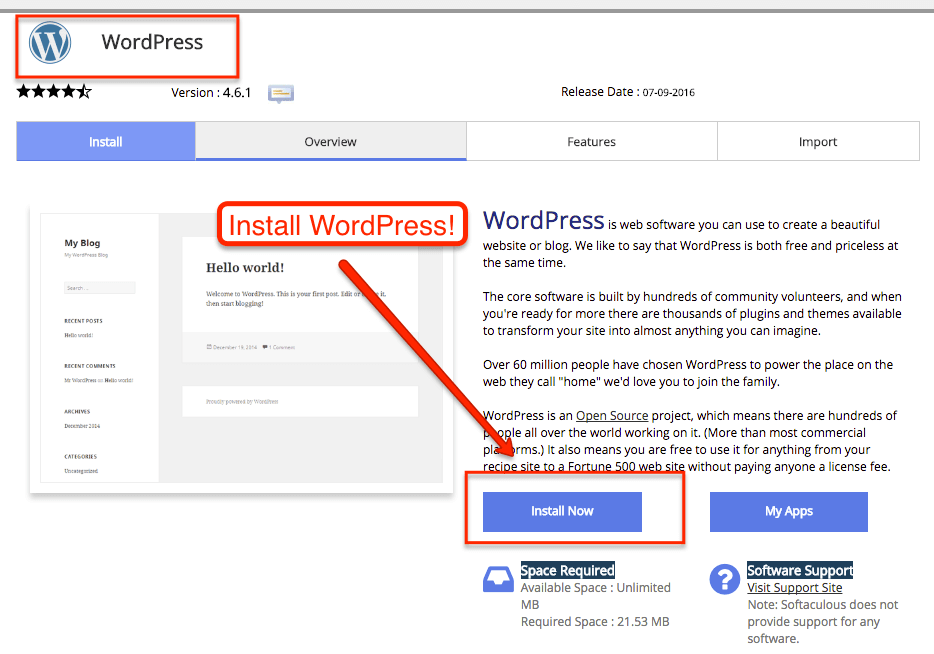
Step 3. Run the WordPress install script.
Open the WordPress auto-install script opened and then continue.
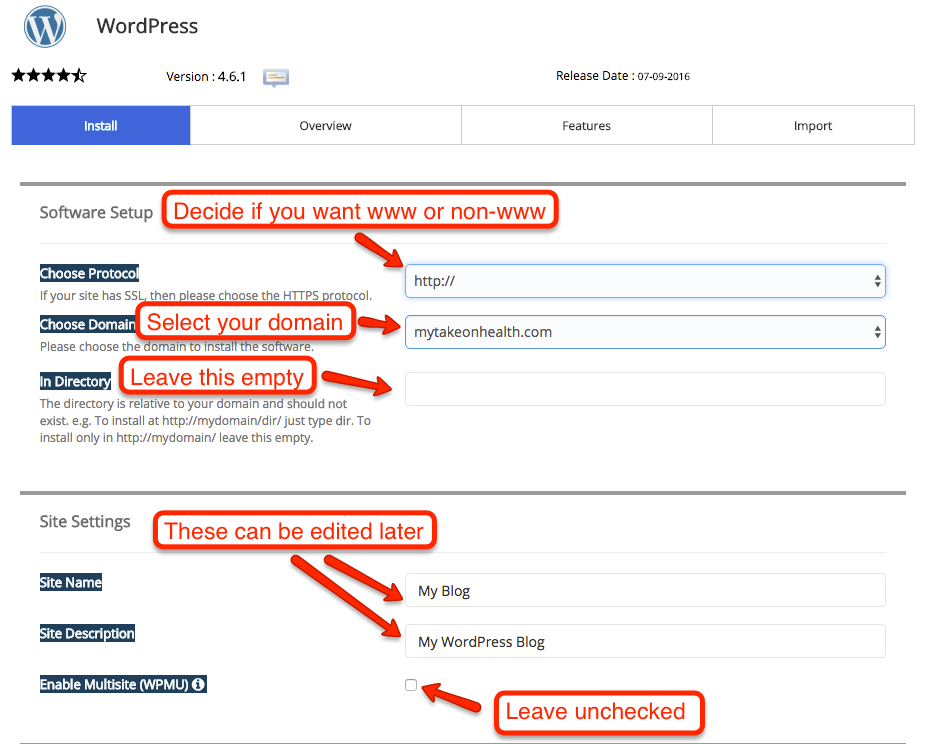
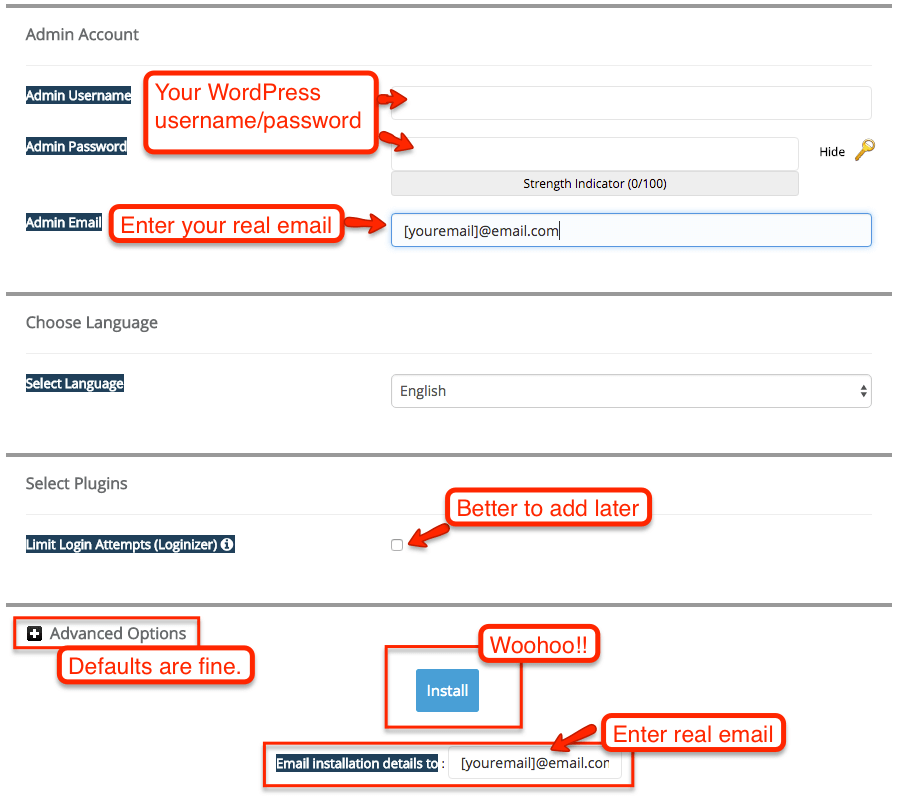
Step 4. Enter website information into installer.
Now you will just fill out your information, and click Install. Be sure that your email address is correct. Leave the field after / blank – that is for only if someone already has a website on the main domain that they want to keep running. Enter your Blog Title – you can change it once you’ve installed WordPress.
Step 5. Confirm installation and log into WordPress Dashboard!
After a few seconds… Congratulations! You’ve got yourself a new WordPress website to use for your beauty blog.
Be sure to copy your username and password in a safe place (it will also be emailed to you).
And go login to your new WordPress site at http://[yourdomain.com]/wp-admin You can also check your email to get links & login information.
Immediate Configurations
Immediately after logging into WordPress take a second to look around. I have a full tour of the WordPress Dashboard. But there are a couple of custom settings that you’ll need to configure.
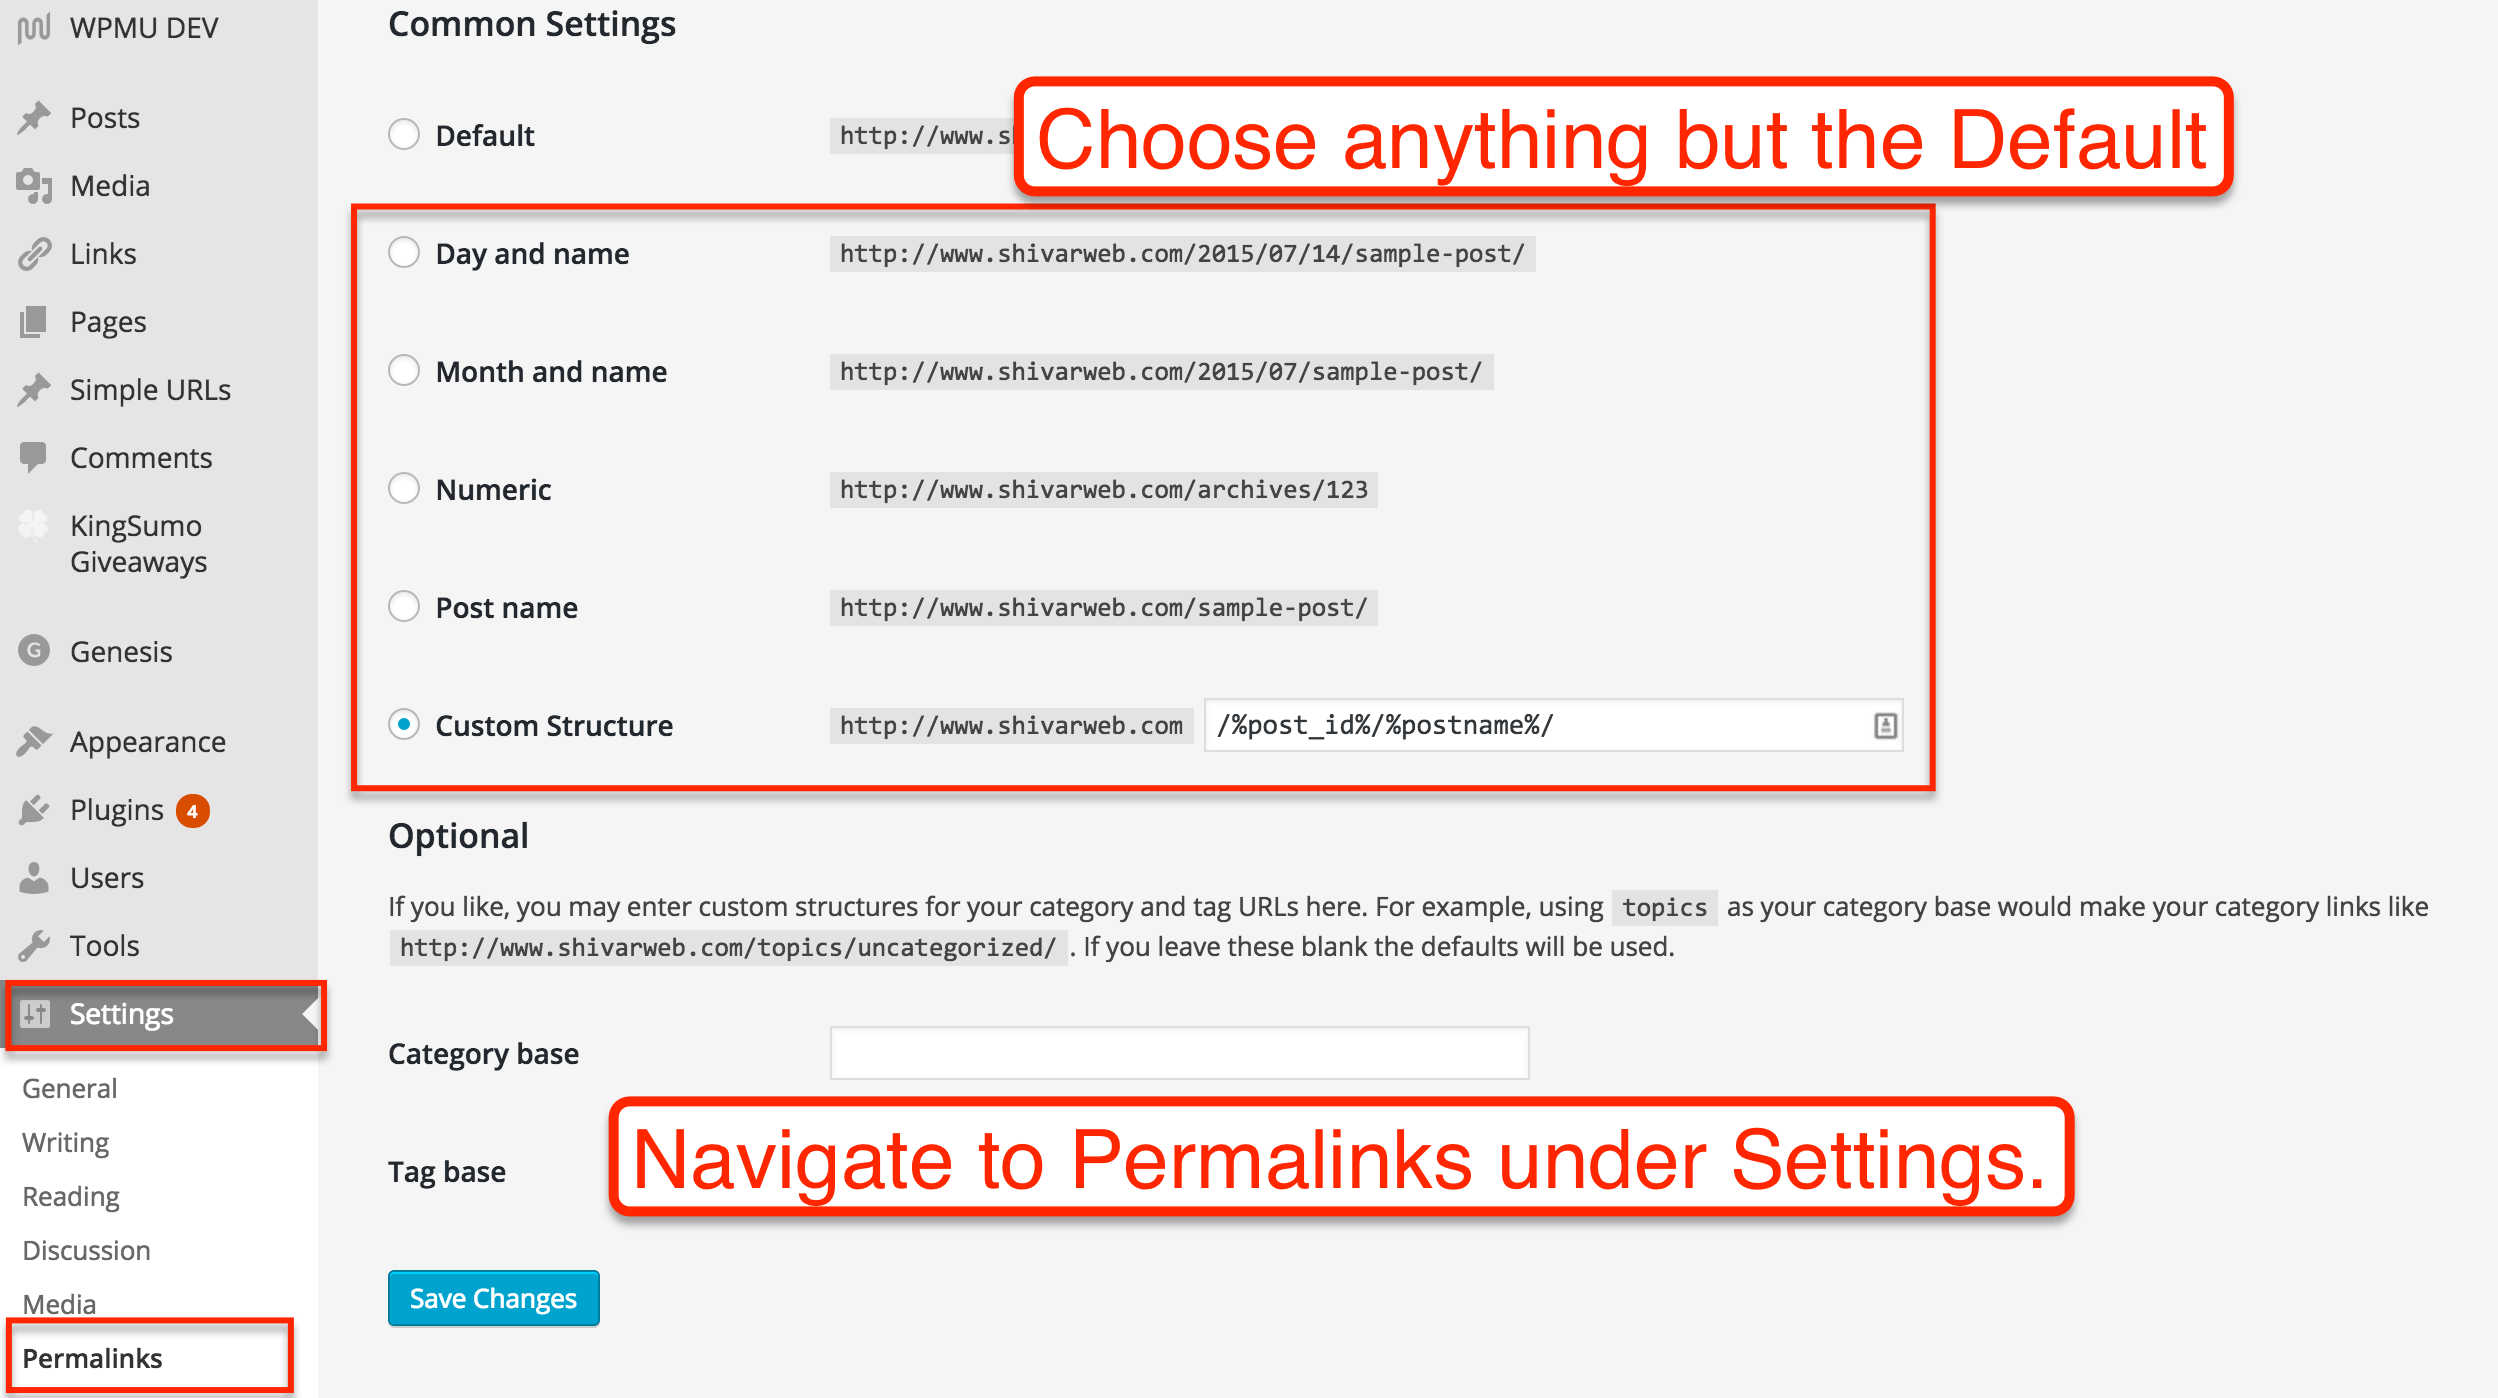
First, go to Settings → Permalinks then choose how you want your blog post URLs to appear. Choose how you want your URLs to be displayed. Don’t choose Default. Then click “Update”
Second, go to Settings → General → then choose your time zone and website name.
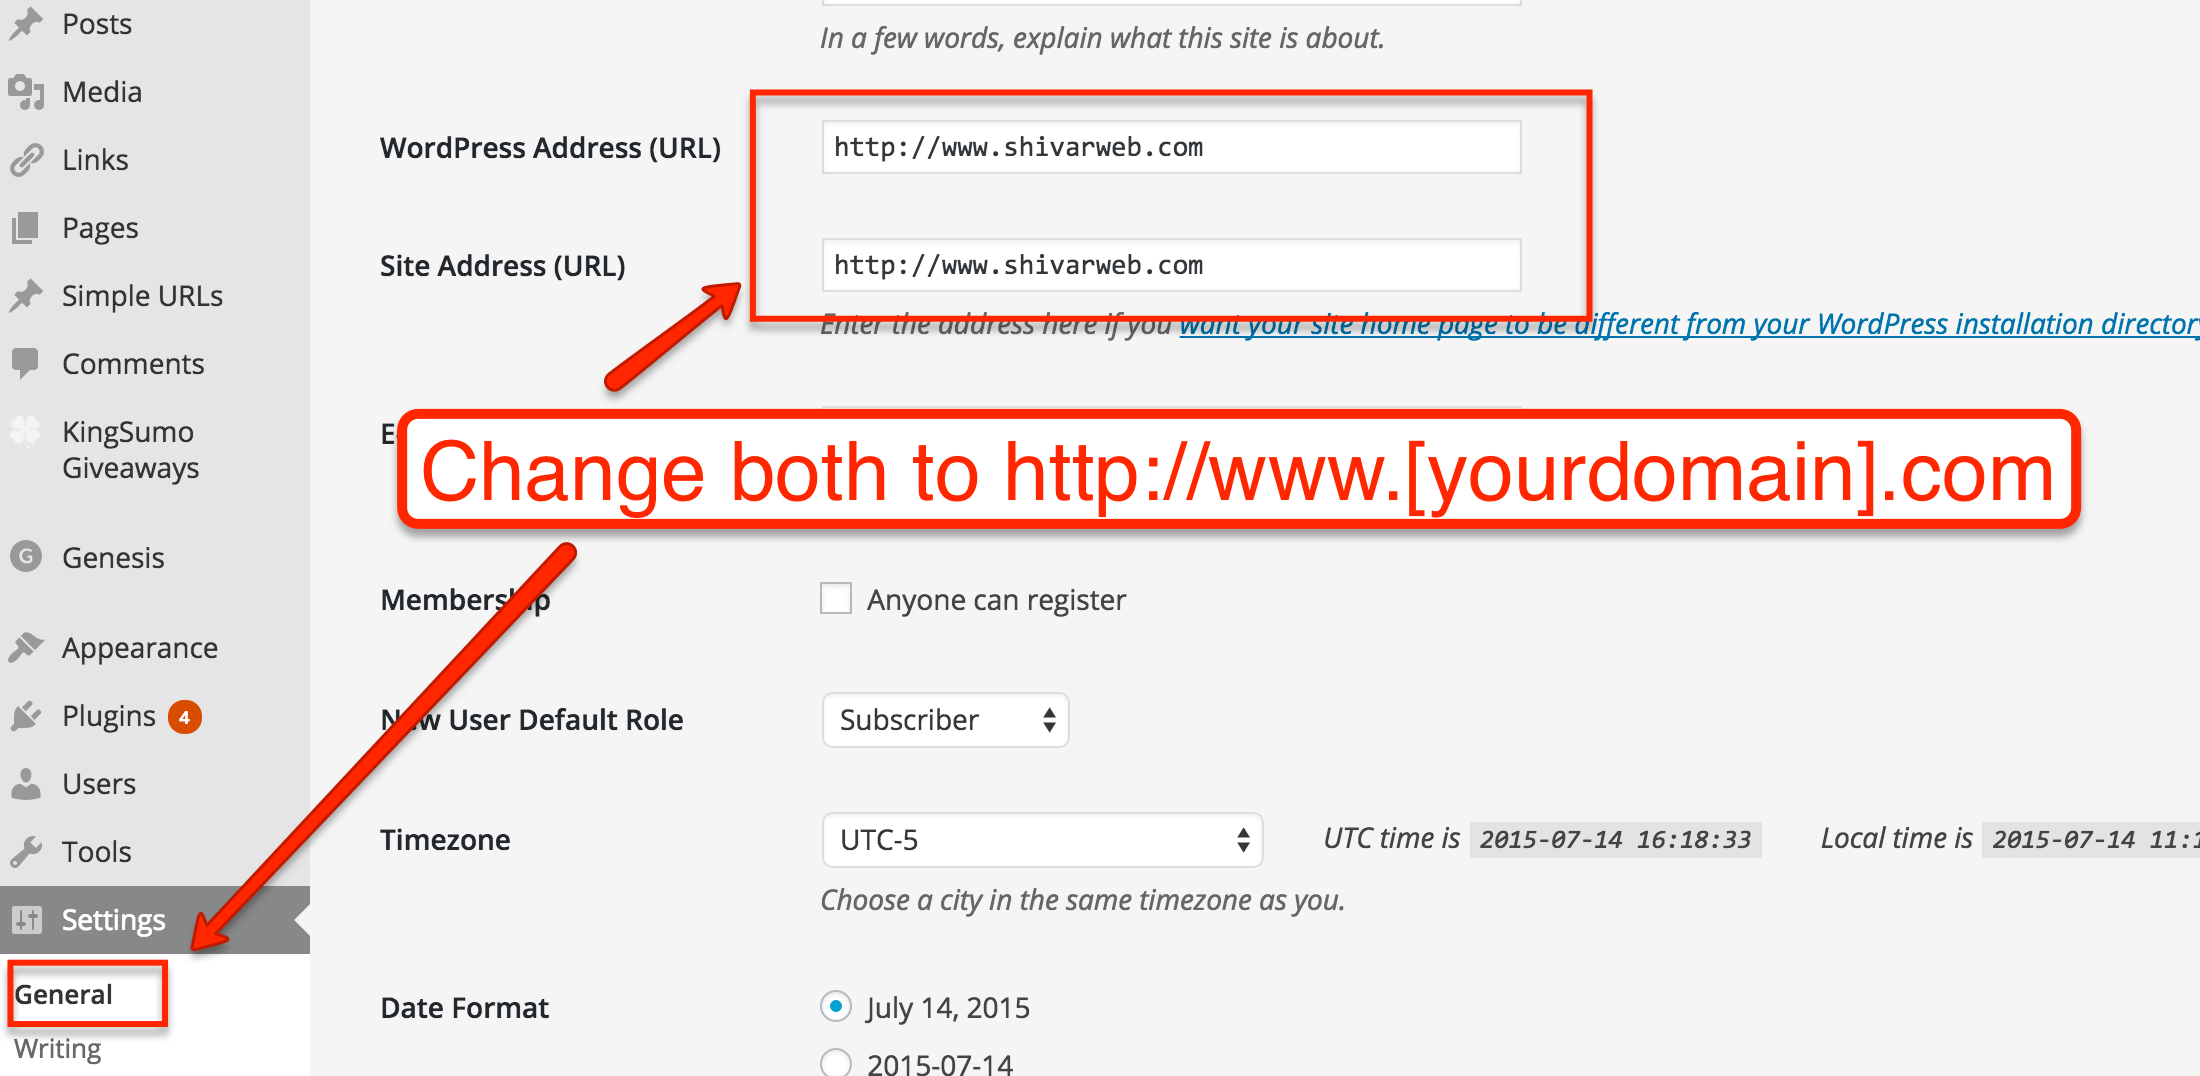
Third, if you want your website to be www.yourdomain.com instead of yourdomain.com – then go to Settings –> General and change both the Site URL and WordPress URL to http://www.[yourdomain].com when you click update, you will have to log back in.
If the WordPress Dashboard looks daunting, check out my series of tutorials.
Themes / Design
You can have any website design that you can imagine with WordPress. It is not limited to any type of design because it outputs fully-featured HTML/CSS (the language used by your browser to show a visitor a website).
However, since WordPress implements designs in a structured way, it also allows you to install an off-the-shelf “theme” or pre-made design. Many of these pre-made themes are customizable as well.
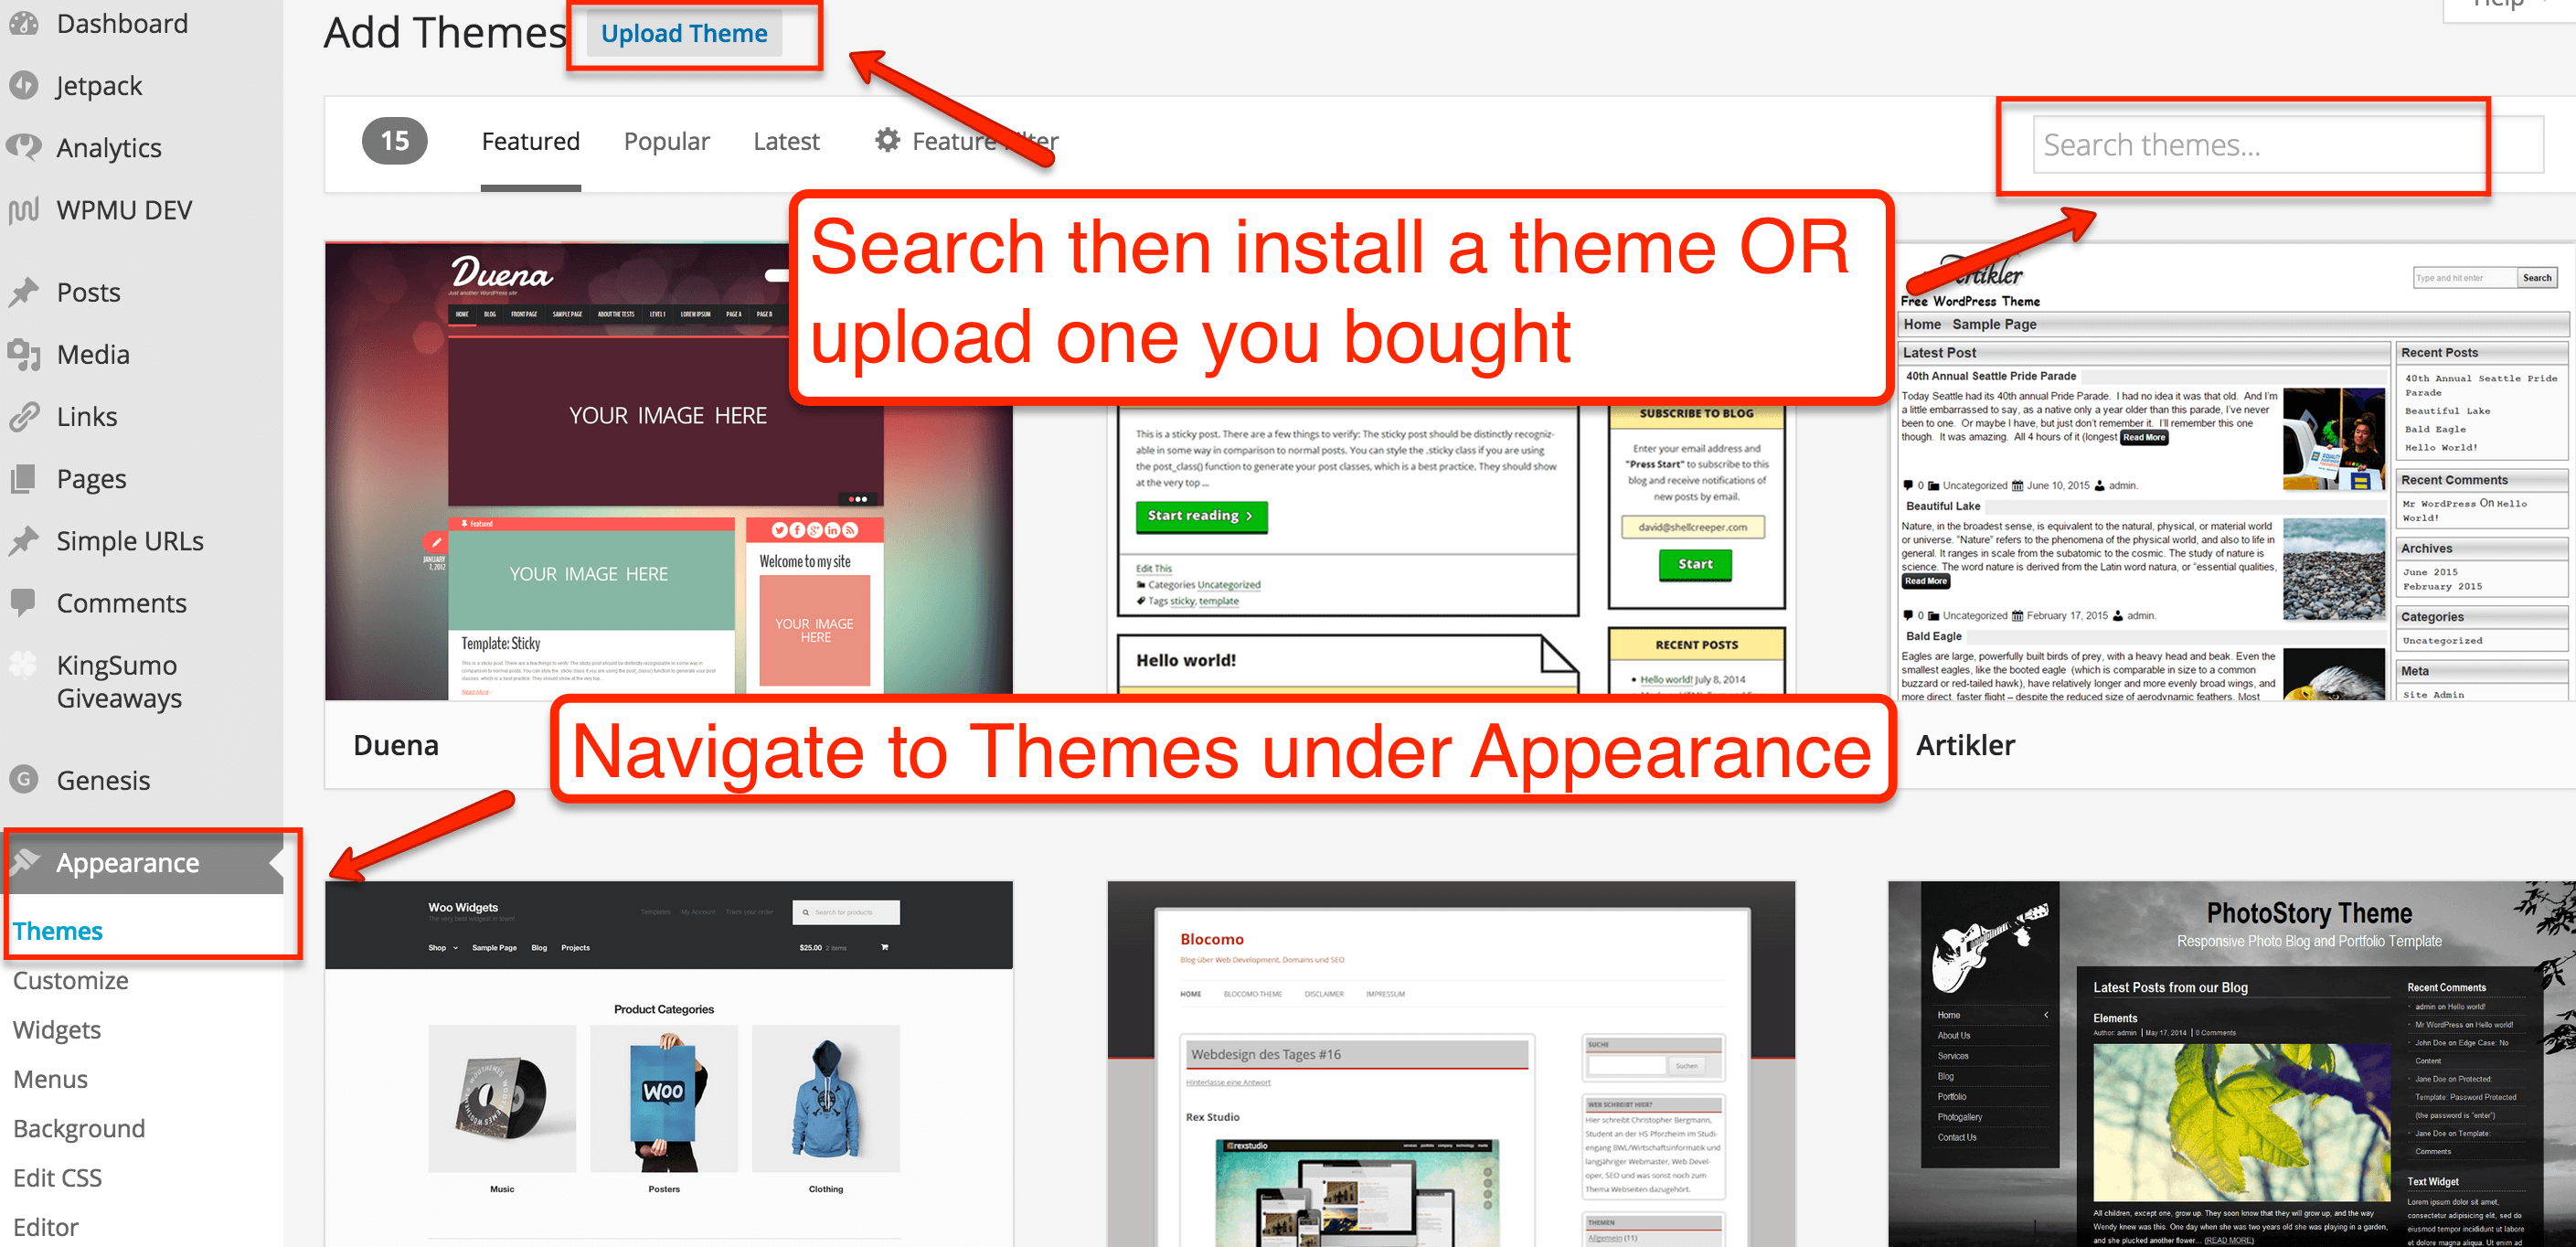
Either way, you can browse free designs and install a theme under the Appearance → Themes section of the Dashboard.
If you can’t find a free theme that you like or would like to buy a higher-quality customizable premium theme, you can certainly shop around for WordPress theme providers. There are thousands. I recommend starting your search at these providers:
StudioPress – They make the Genesis framework, which is a theme “framework” that you can install once, then overlay different skins or “child themes.” This is a popular choice among many larger beauty sites that want their own custom look without hiring a designer per se.
ThemeForest – They are the largest marketplaces for independent designers. Lots of selection at good prices.
Elegant Themes – A very high-quality makers of themes with a look that many beauty bloggers love.
I also wrote a post with my 9+ favorite themes made specifically for Beauty / Fashion websites. Either way, keep in mind that many “themes” can be re-purposed outside of your niche. Many times it’s the addition of a nice logo or “hero” image that makes your design rather than a layout.
Plugins / Functionality
Ultimately, the functionality of your beauty website is up to your tastes and goals. However, most beauty websites have some key functionality that you should go ahead and add to WordPress with plugins.
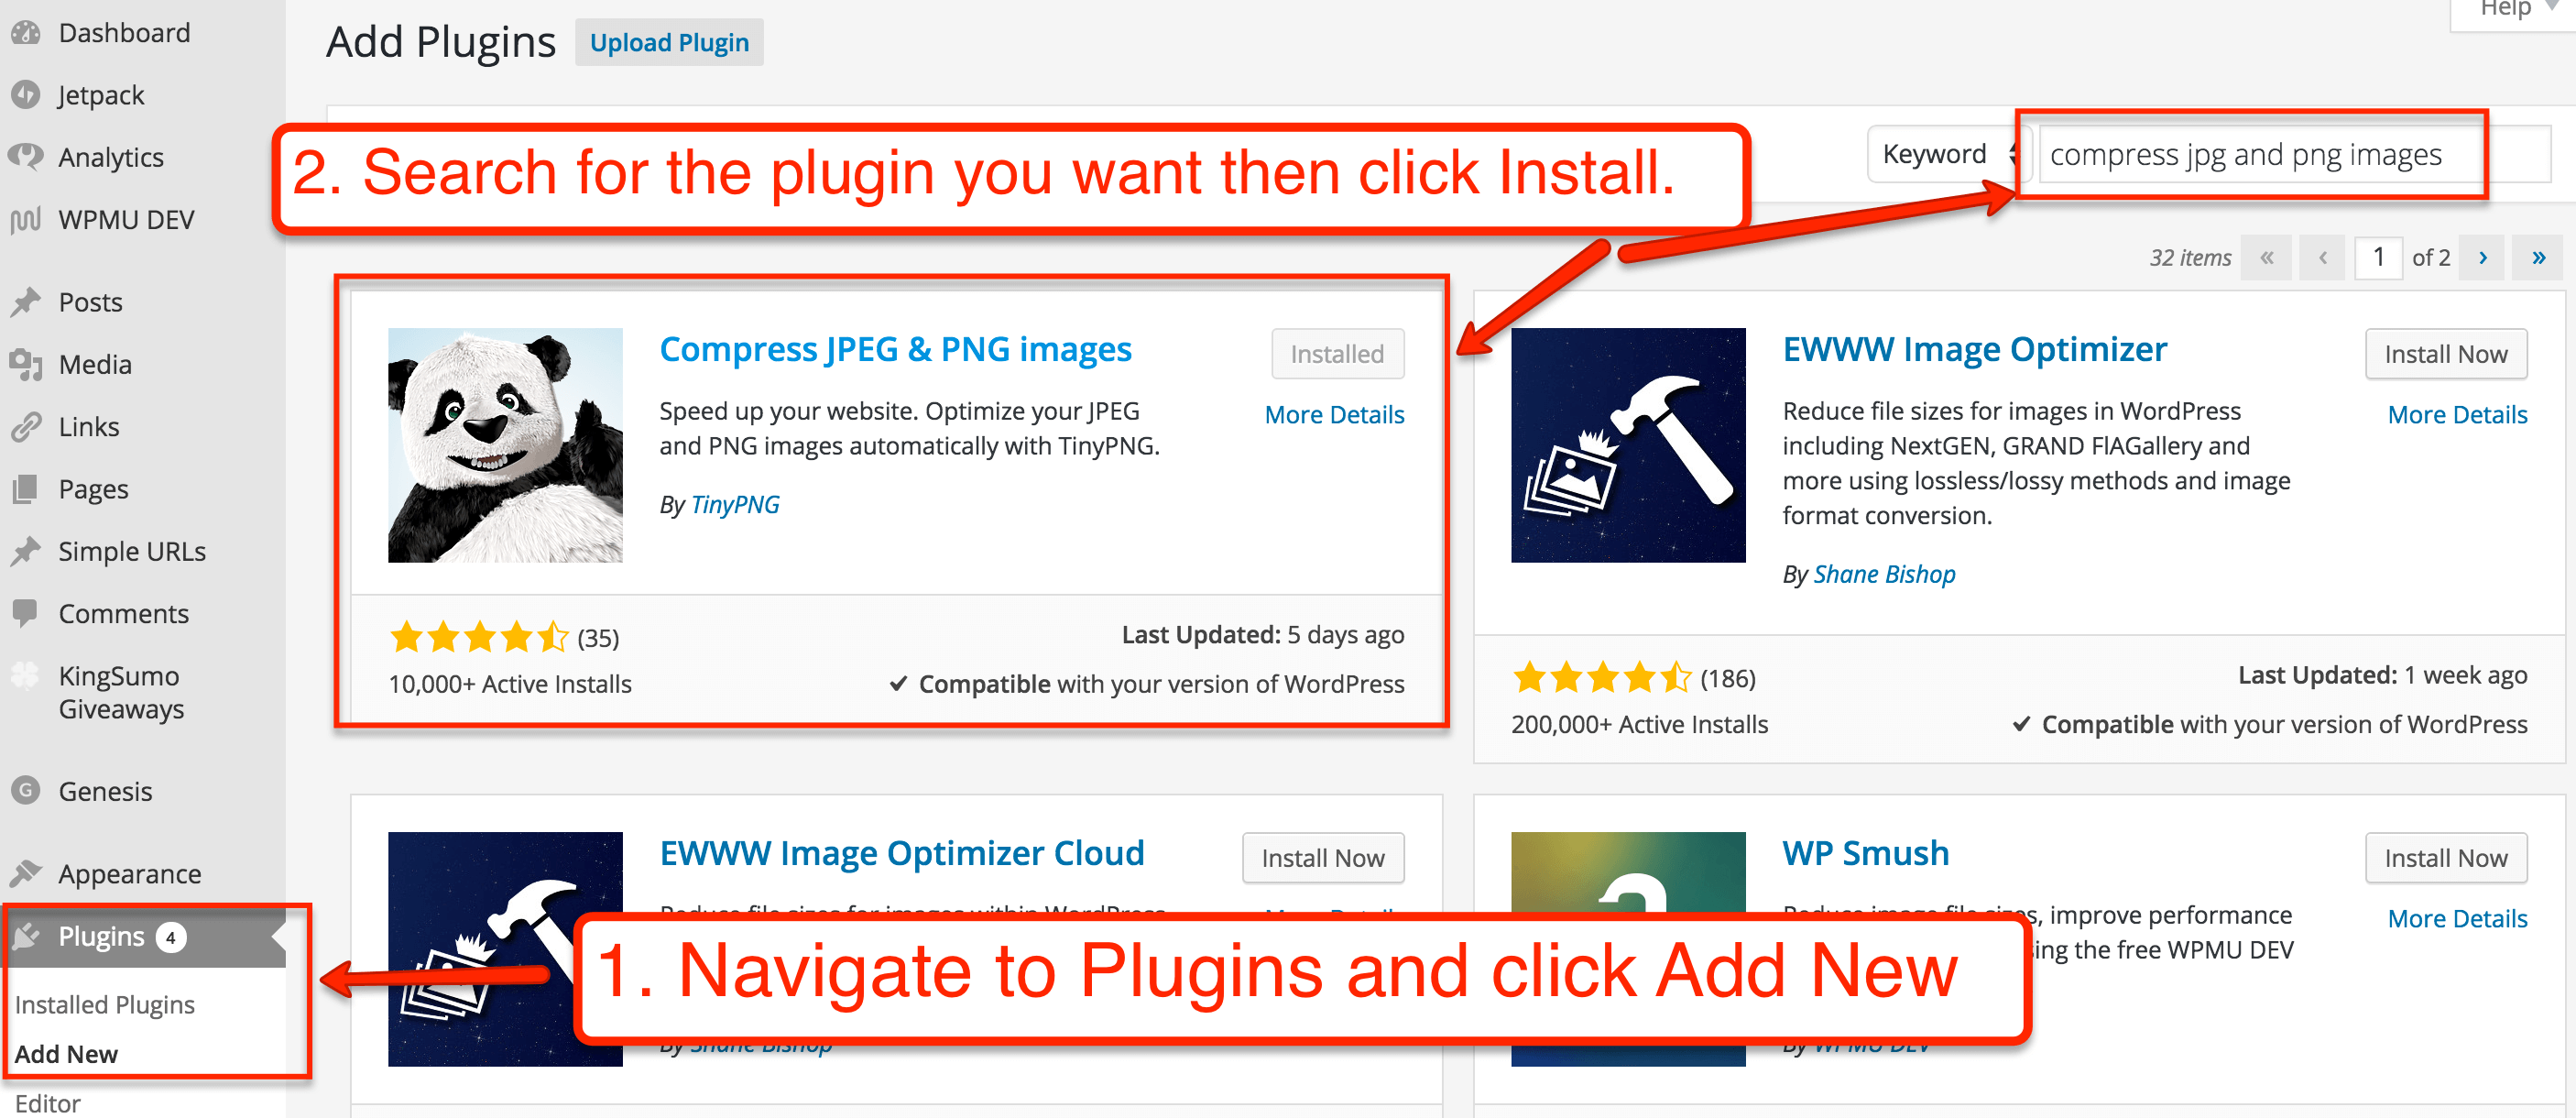
First, get my list of essential WordPress plugins. These are plugins that nearly every website needs to have. Next, be sure to install these plugins.
Compress JPEG & PNG Images – this plugin compresses your images as you upload them to WordPress. With a beauty or makeup-focused website, you’re going to have a lot of images. This plugin compresses the file size of the images so that they don’t take as long to load.
WP Canvas – Gallery – this plugin extends WordPress’ built-in support for picture galleries to allow you to display images in all sorts of interesting ways.
Pinterest Pin It Button For Images – this plugin adds a “Pin It” button to all your images to help visitors share specific images to Pinterest (which is essential for any aspiring beauty blogger).
OptinMonster – this is a highly customizable plugin for calls to action, managing user downloads (ie, recipe PDFs and giveaways), and collecting emails. And unlike competitors, it’s lightweight and highly customizable. It’s also ridiculously effective.
MailChimp for Mailing List Software – this isn’t a plugin per se, but it is an essential marketing tool to help you differentiate yourself from the thousands of beauty websites on the Internet. You can synchronize it with OptinMonster or paste the subscribe to email list directly on your website.
YARPP – this plugin will show a “related posts” box beneath your posts. It helps improve engagement and keeps people on your website.
Outside of those, be very choosy about what plugins to add. Too many poorly written plugins can affect site performance and be more trouble than they are worth.
Marketing / Monetization
Unless you are creating a public journal, your website is your audience and your audience is your website.
To build a successful beauty website or makeup blog, you have to be hyper-focused on your specific audience. The beauty & makeup space is competitive, but it’s also huge.
Your job as a website owner is to define your audience and market to them wherever they are at to get them to your website. That might be Pinterest (actually, it definitely is Pinterest), but it also might be Google Search, YouTube, Facebook, Twitter, random forums, other websites, etc. The goal is to get them to your beauty website.
Once they are on your website and are truly fans of your work, there are dozens of ways to make money with your beauty website or makeup blog.
The most common way to make money is with advertising. And within advertising, you can get paid a lot of ways.
One way might be to get paid per sale (CPA or affiliate in the jargon). CPA is where you link to products on retailers’ websites and receive money if someone you refer buys something. You can get started by joining a network like Commission Junction or ShareASale. Look for advertisers that you love to recommend whether they pay your or not. They have all the large brands such as Ulta, Sally Beauty, Skin Store, and others.
Another way to get paid via advertising is to place CPM or CPC ads on your site. With CPC or CPM ad, you are paid by the click or the impression. It’s a more stable but less lucrative potential than CPA. The jargon here is CPC or CPM. You can get started by joining Google AdSense and pasting their ad code on your site (ie, in a sidebar widget, etc). Google will then broker advertisers to your site and pay you your cut of the revenue. An alternative is to look at BuySellAds.
But outside of advertising, there are plenty of ways to sell your own information product or even your own products. If you are interested in that, be sure to check out my guide to installing the WooCommerce plugin for WordPress.
If you want to do workshops or events, check out my guide to adding appointments and events to WordPress.
Sometimes it’s as simple as placing a Media Kit page on your site or an advertising page and selling ads directly (use a plugin called OIO Publisher to manage them).
In the end – your website is only limited by your imagination. Now that you have a website powered by WordPress on your own server, you can do really whatever you can dream up. You just have to execute on it.
Next Steps
- Get your domain name and hosting account
- Install and configure WordPress
- Get the a theme for your design
- Get the right plugins
- Build an audience!