This guide covers how to build an auction website like eBay. We’ll be using WordPress to build the site, the WP Auctions plugin to build out the foundation & bidding function with additional next steps to grow the site further if needed.
We’ll walk through how to build everything 100% from scratch, so that you can get up and running quickly with nDasho previous knowledge necessary.
You may have heard of WordPress as a blogging platform. That is how it started out, but it has been transformed over the years into a versatile “content management system” – ie, it gives you a backend to create, edit and manage any type of content – including auction/bidding content.
Before we dive in though, keep in mind that setting up an auctions site with WordPress is not the best fit for everyone.
Here’s generally how I’d break it out. Using WordPress to set up an auction marketplace like eBay will be a good fit if:
- You want something relatively small (ie, not a multi-million dollar platform like eBay) for your personal use, event auction, small business, non-profit, or to get a concept up and running before investing thousands of dollars in a custom development.
- You want full control over your site (ie, you don’t want to outsource your auction to an existing solution like eBay).
- You want to avoid the fees and lock-in of other platforms built for non-profits and event auctions.
- You aren’t daunted by a bit of technical work (ie, hearing the acronym “FTP” makes you more curious than afraid).
- You want a common platform that has a large community of developers so that you can expand easily if needed.
WordPress will not be a good fit for you if:
- You are building out a large established auction focused business.
- You want all the technical details taken care of for you
- You want dedicated customer support line
If using WordPress for your auction website does not look like a good fit, then I’d recommend using a solution like Bidding Owl.
Otherwise let’s dive into the guide!
Quick disclosure: I receive customer referral fees from companies mentioned in this post. All my opinions are based on my experience as a paying customer or consultant to a paying customer.
Getting Started – Setting Up The Website
Your absolute first step for setting up a marketplace/auction website is to get a domain name (ie, your web address) pointed to a hosting account (ie, where your website lives). And then to install WordPress on your hosting account so that you can log in, set it up and customize it.
Here’s my guide to setting up WordPress step by step on hosting with a domain from scratch.
One thing to keep in mind with hosts is that auction sites need even more memory for PHP than a standard WordPress install since they can be more complex and use more memory than a simple blog.
If you’re starting out small (a few auctions, low thousands of visitors per month), a shared linux hosting account (like the one I mentioned in the setup guide) is good, but it needs to have more than 64M of memory…preferably 256M.
For hosting, I recommend HostGator (see their plans here), with InMotion Hosting and BlueHost (see their plans here) also being good options (I’ve reviewed each here, here, and here).
If you’re starting out big (lots of auctions, many thousands of visitors per month), you’re going to need either a managed hosting account from a company like WP Engine or a VPS hosting account from HostGator.
Here’s my guide to setting up WordPress step by step on hosting with a domain from scratch.
Installing WP Auctions Plugin
Now that you have WordPress installed, we’re going to use a plugin to extend the functionality of WordPress so that you can run auctions.
There’s several auction plugins available, but the most straightforward and reliable one right now is WP Auctions. It’s a paid plugin for $35 to $89 (depending on your plan) as a one-time fee. In my research, the fee was worth it given the quality and support of the plugin. The free auction plugins options had too much adware, suspect code, and infrequent updates to be worthwhile. If you choose another, these instruction will be similar, but the remainder will use WP Auctions as the example.
Here’s WP Auctions’ sales pitch and tutorial (a bit dated, but still relevant) –
First, go to WP Auctions and purchase the plugin.
Second, download the plugin to a folder on your computer.
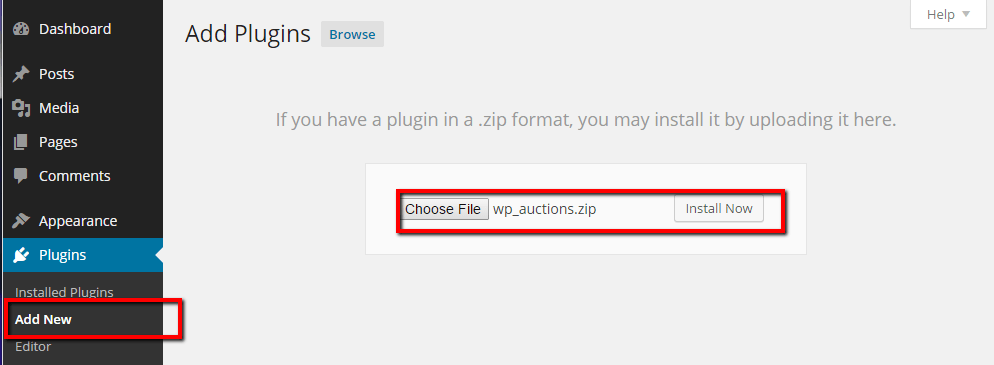
Third, login to your WordPress install. In the WordPress Dashboard, go to Plugins → Add New. Upload the plugin folder from your computer and install. Once installed, activate the plugin and we can dive into setting it up.
Setting Up WP Auctions
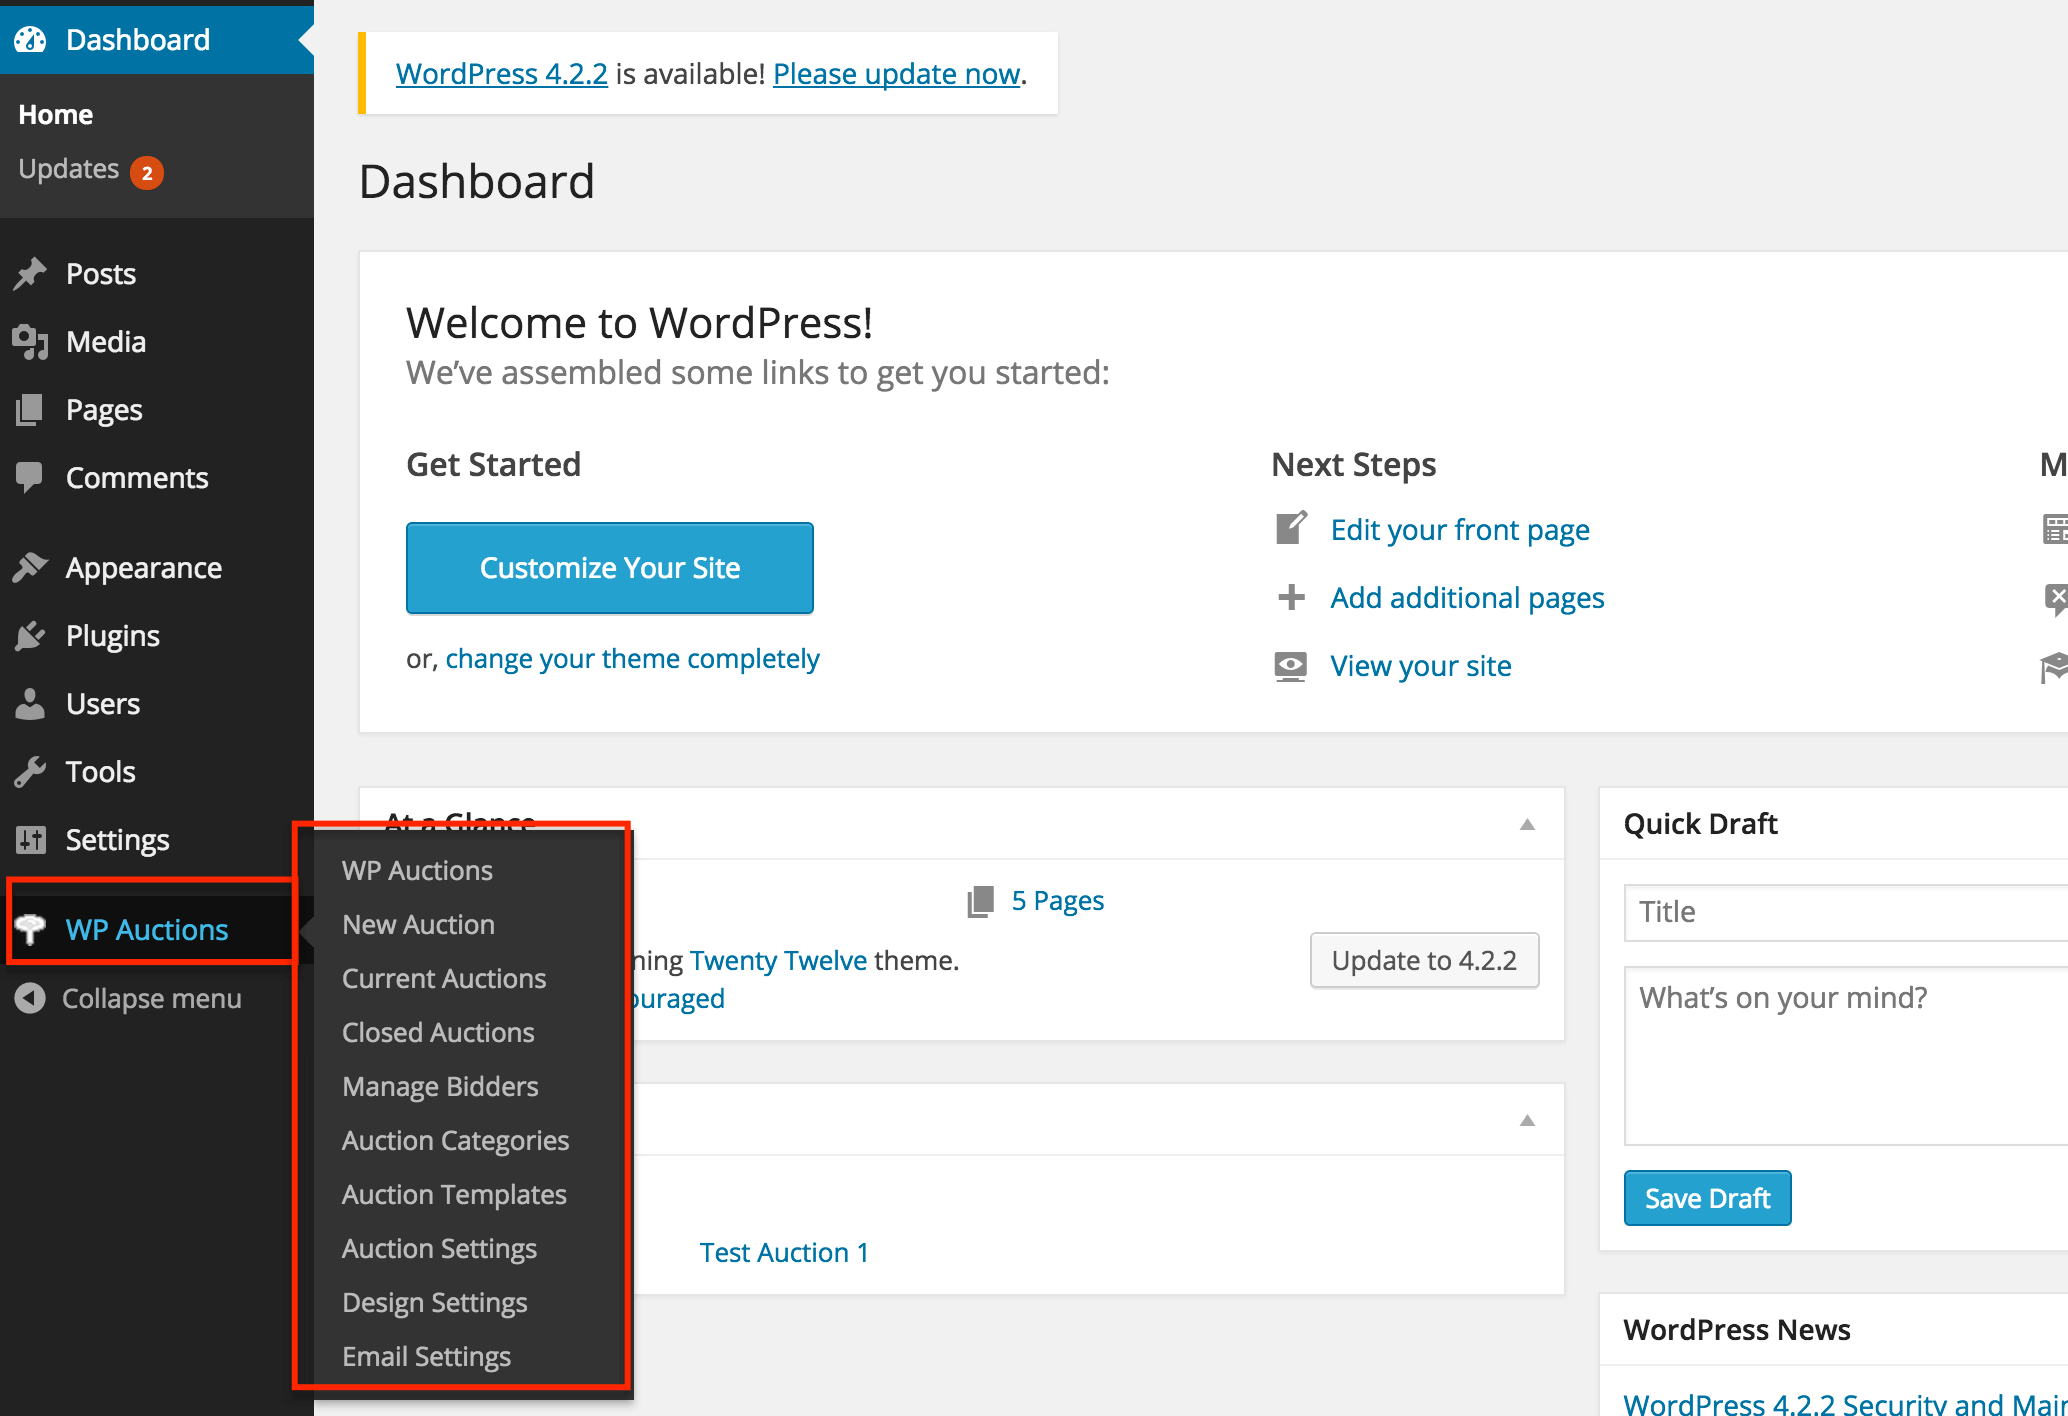
Everything for WP Auctions is under the WP Auctions tab located in the sidebar of the dashboard. It comes fully functional out of the box with options to customize the design and notification options.
There are a few settings to adjust initially by going to the Auction Settings section.
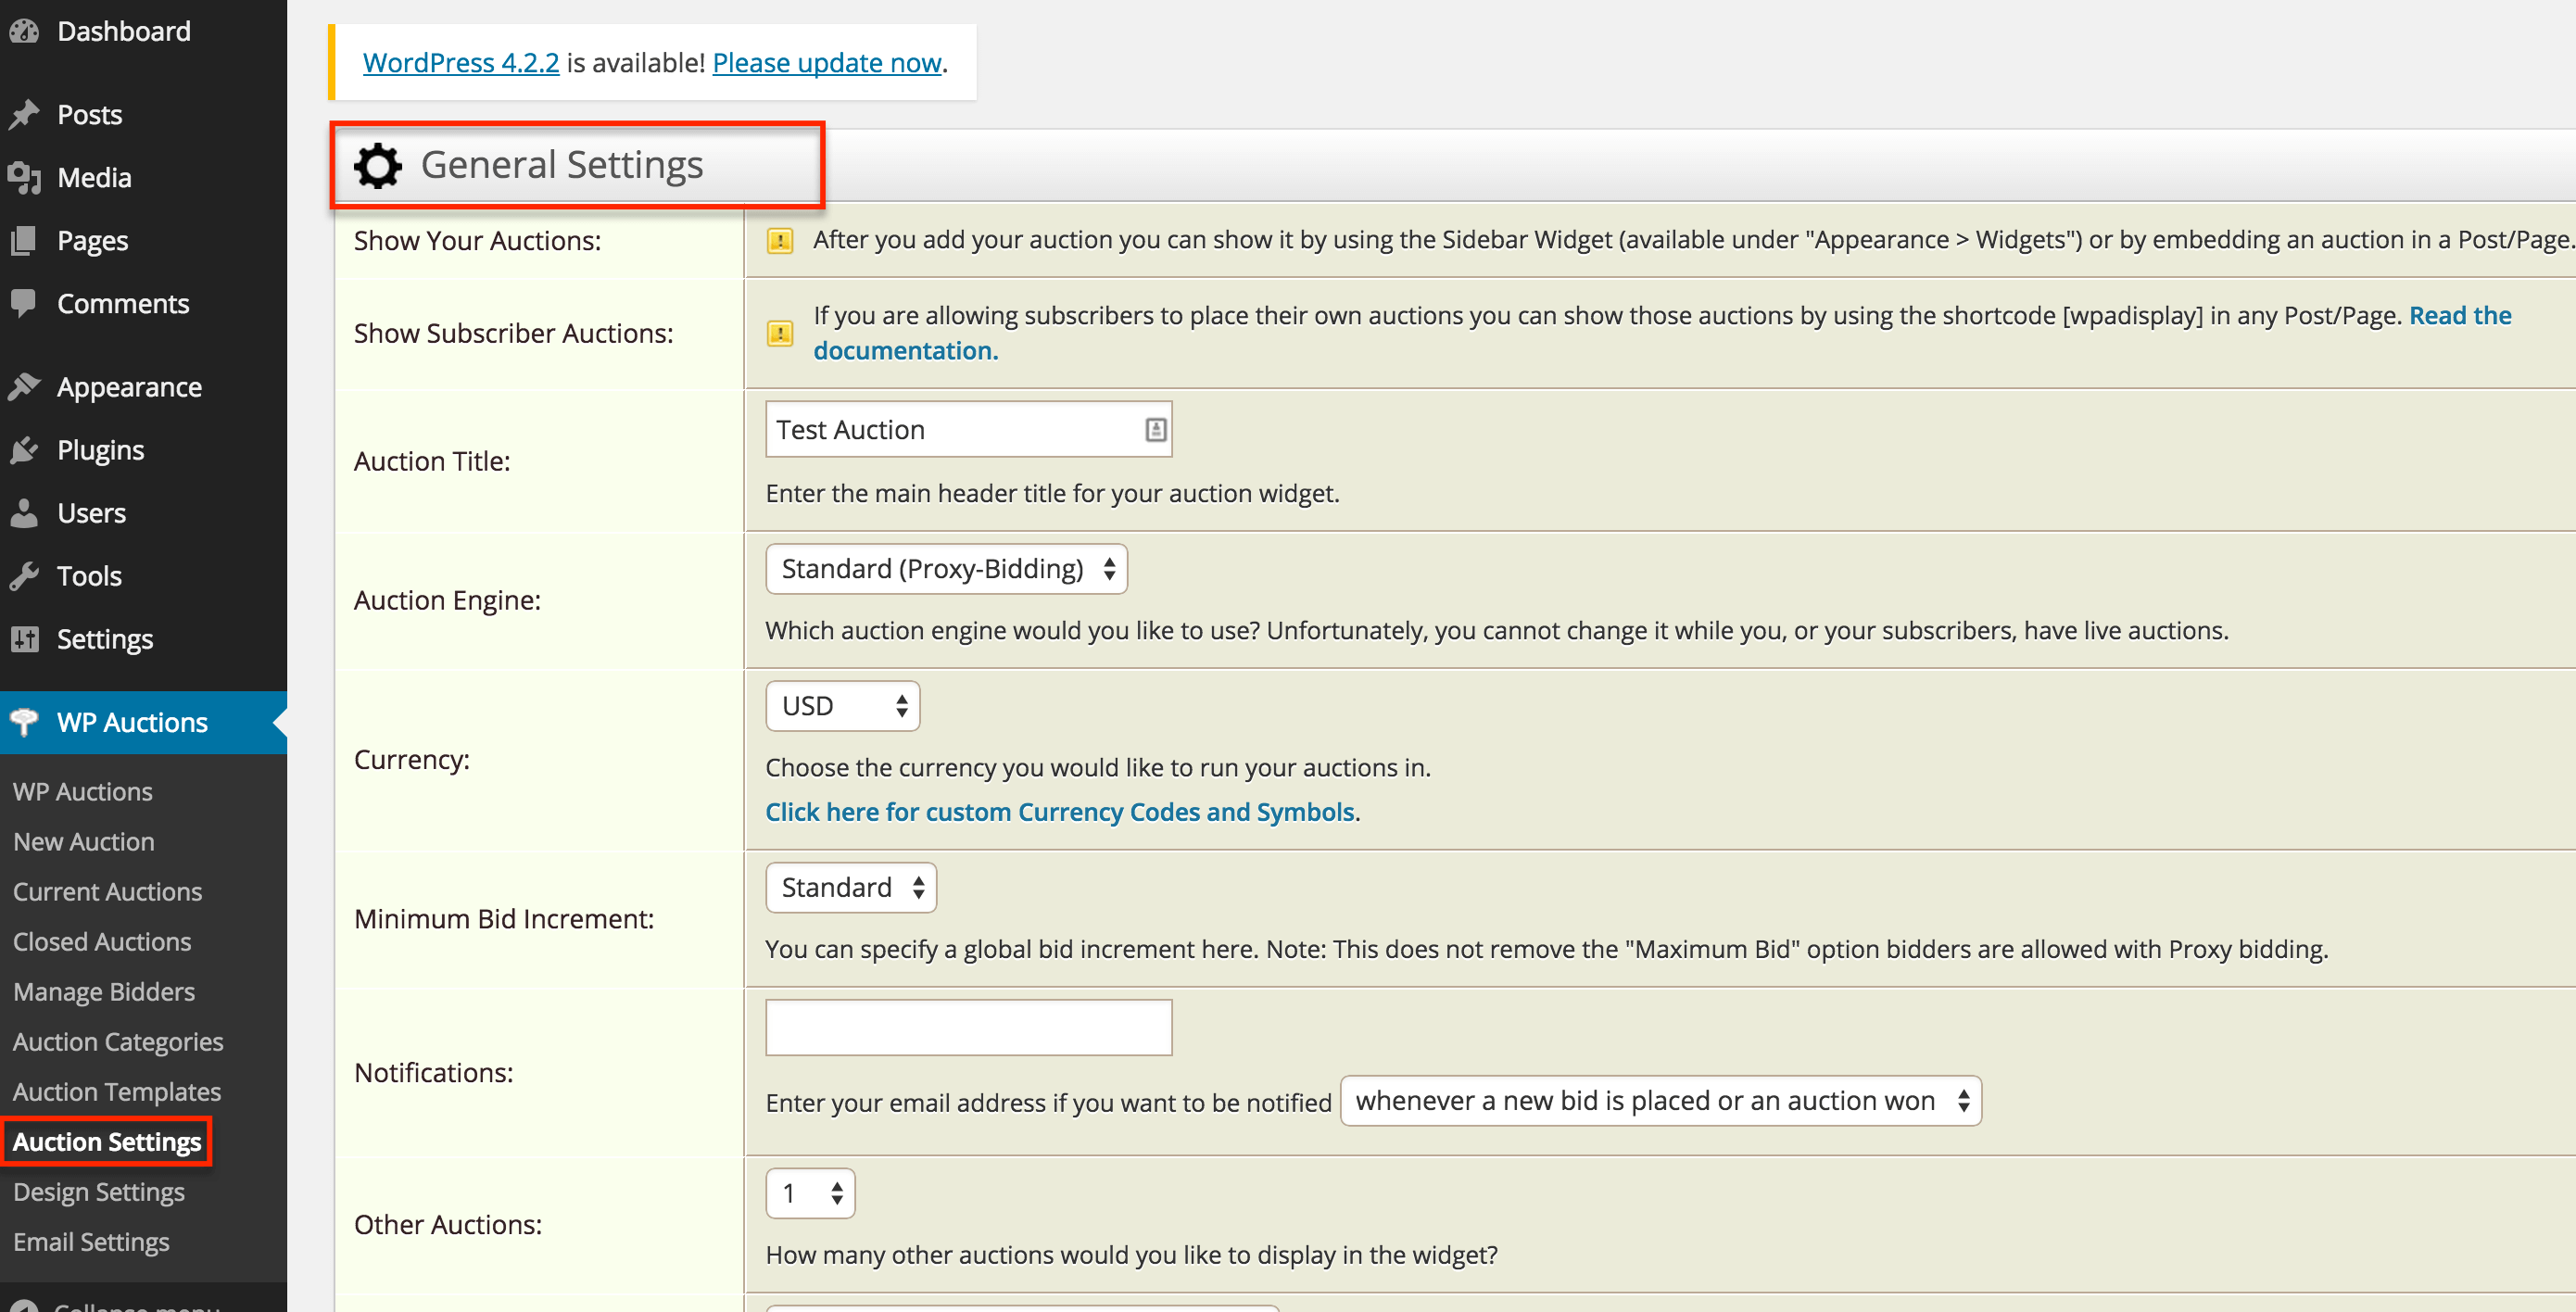
Under General Settings:
- Rename your Auction Title to your brand or event
- Review other settings. I recommend keeping the default until you have set up your first test auction.
- Choose your auction “engine.” Proxy bidding, the default, is the most well-known online since it is the default for sites like eBay. Bidders enter their maximum bid and the engine automatically raises the bid until your max bid is eliminated. You can also run a traditional (Simple) bidding system or a reverse auction.
- Click Update Options
Under Payment Settings:
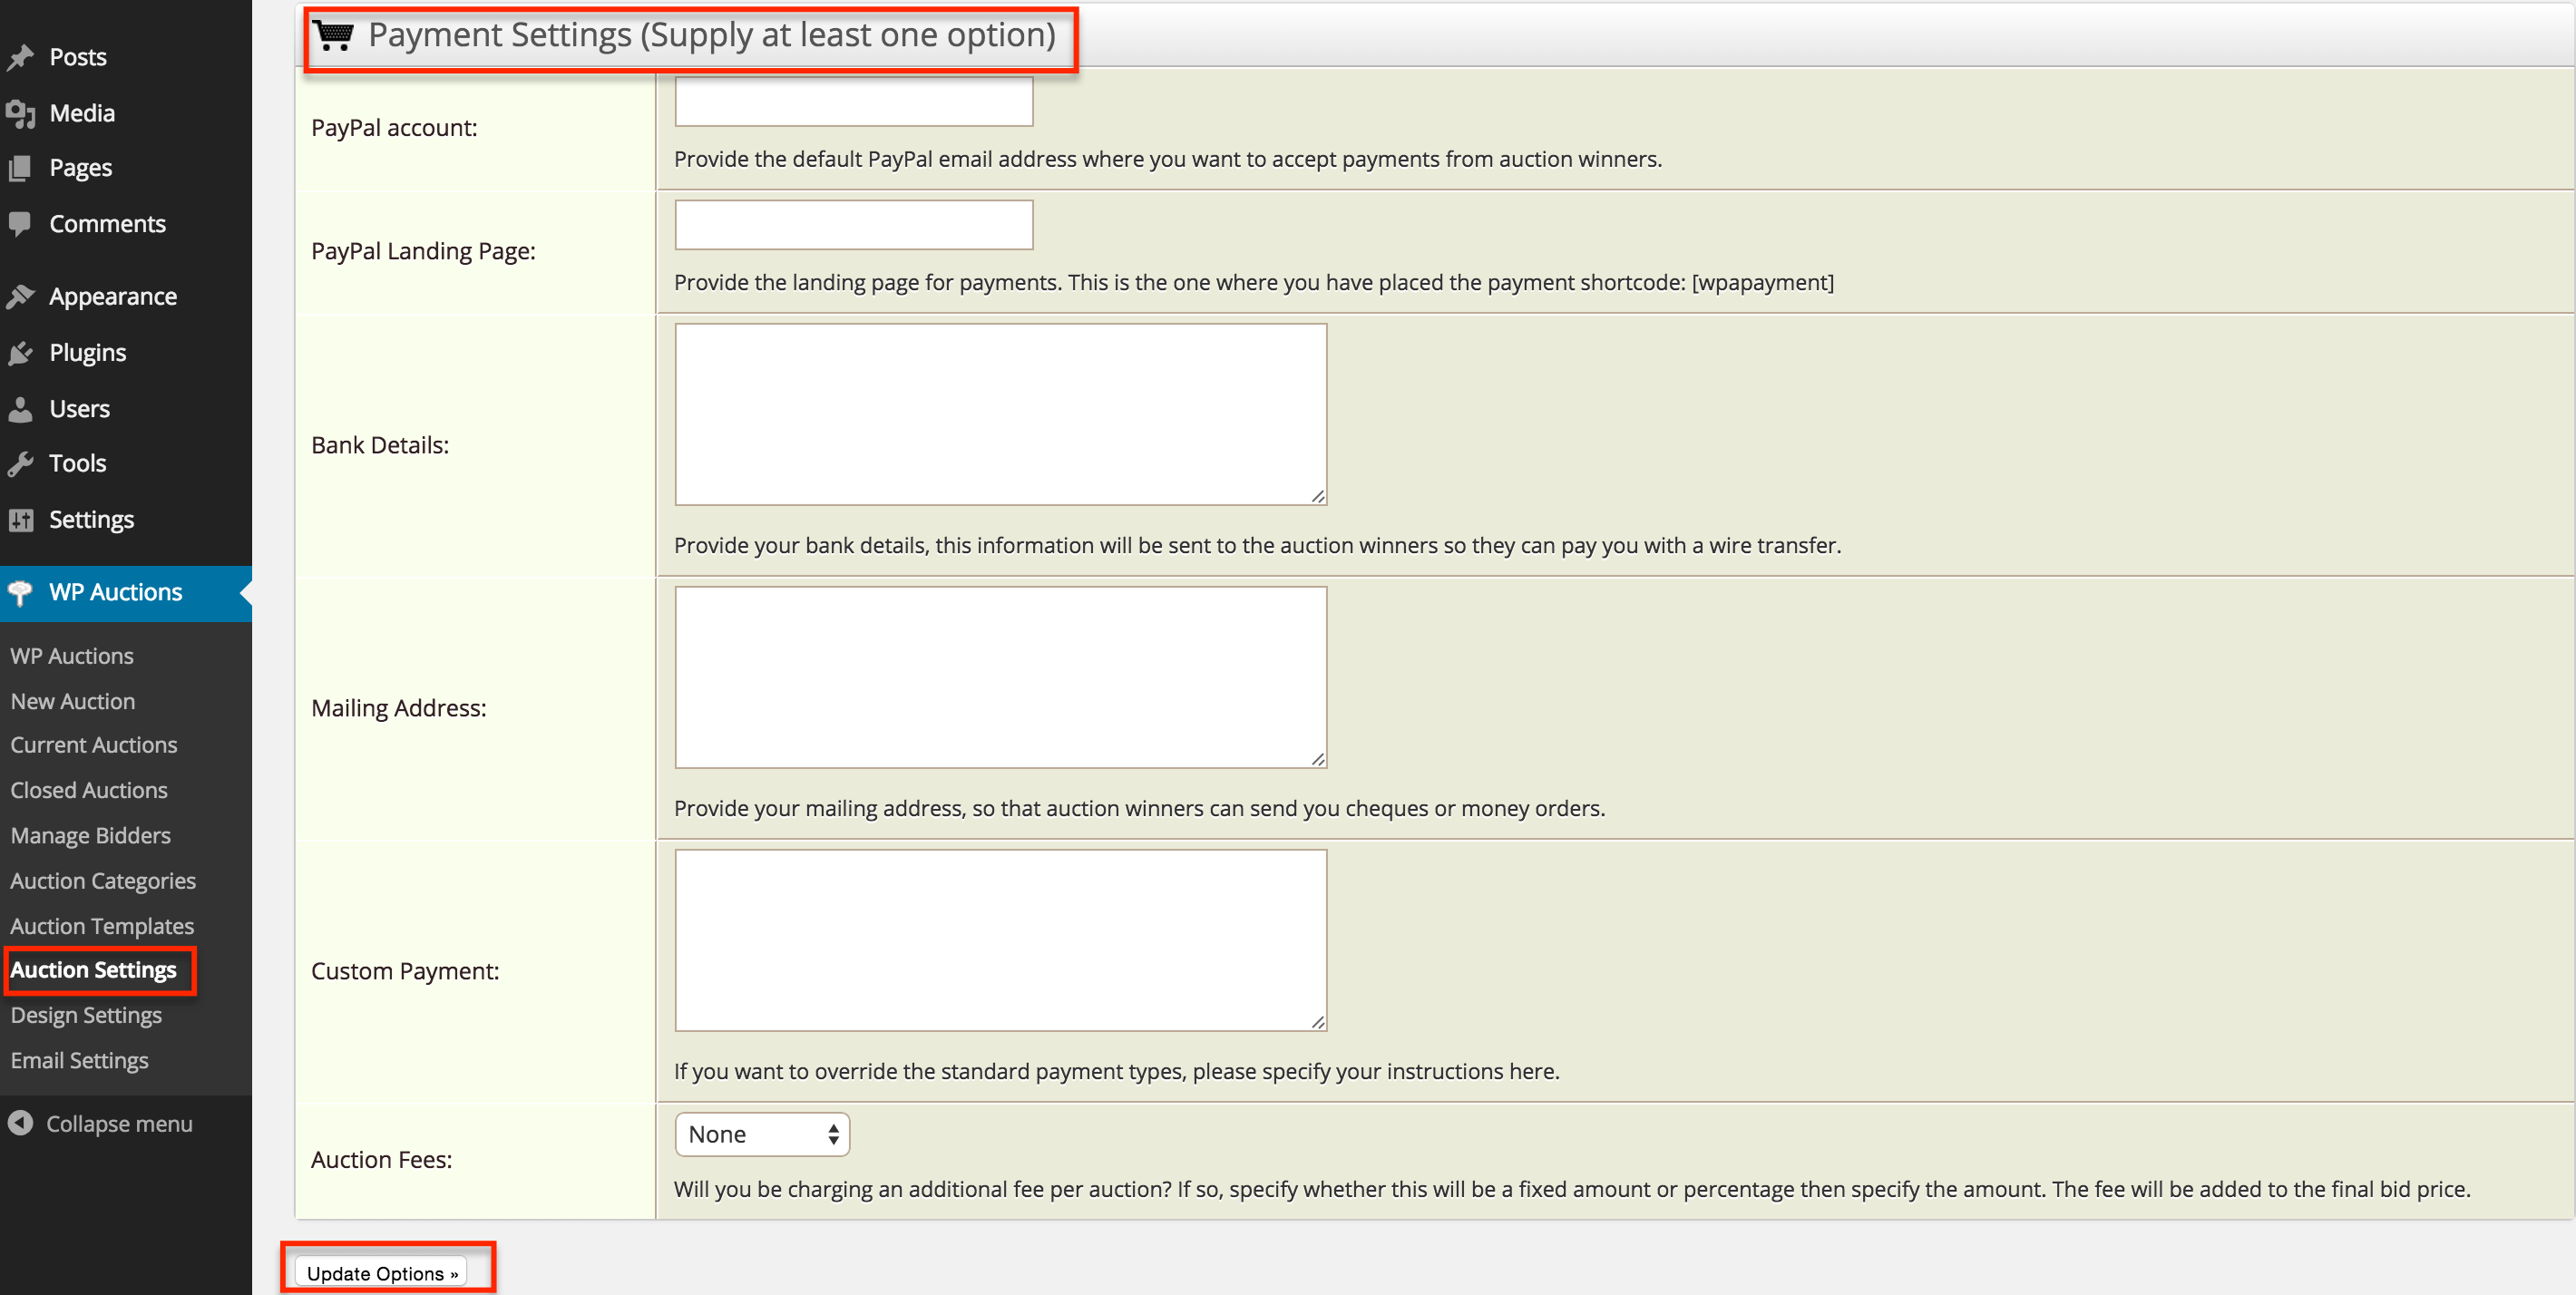
- Enter your PayPal account
- Click update options
- Enter a URL for a payments page, such as [yoursite].com/payments
- Next, Add A New Page with the Pages link in the sidebar. In the main editor, add the shortcode [wpapayment] and name the page Payments. Publish it and confirm that it has the same URL as the payments page you entered earlier in Auction Settings.
- Return to payments settings under Auction Settings and resume entering payment details as necessary.
- Review and update options
Under Other Settings:
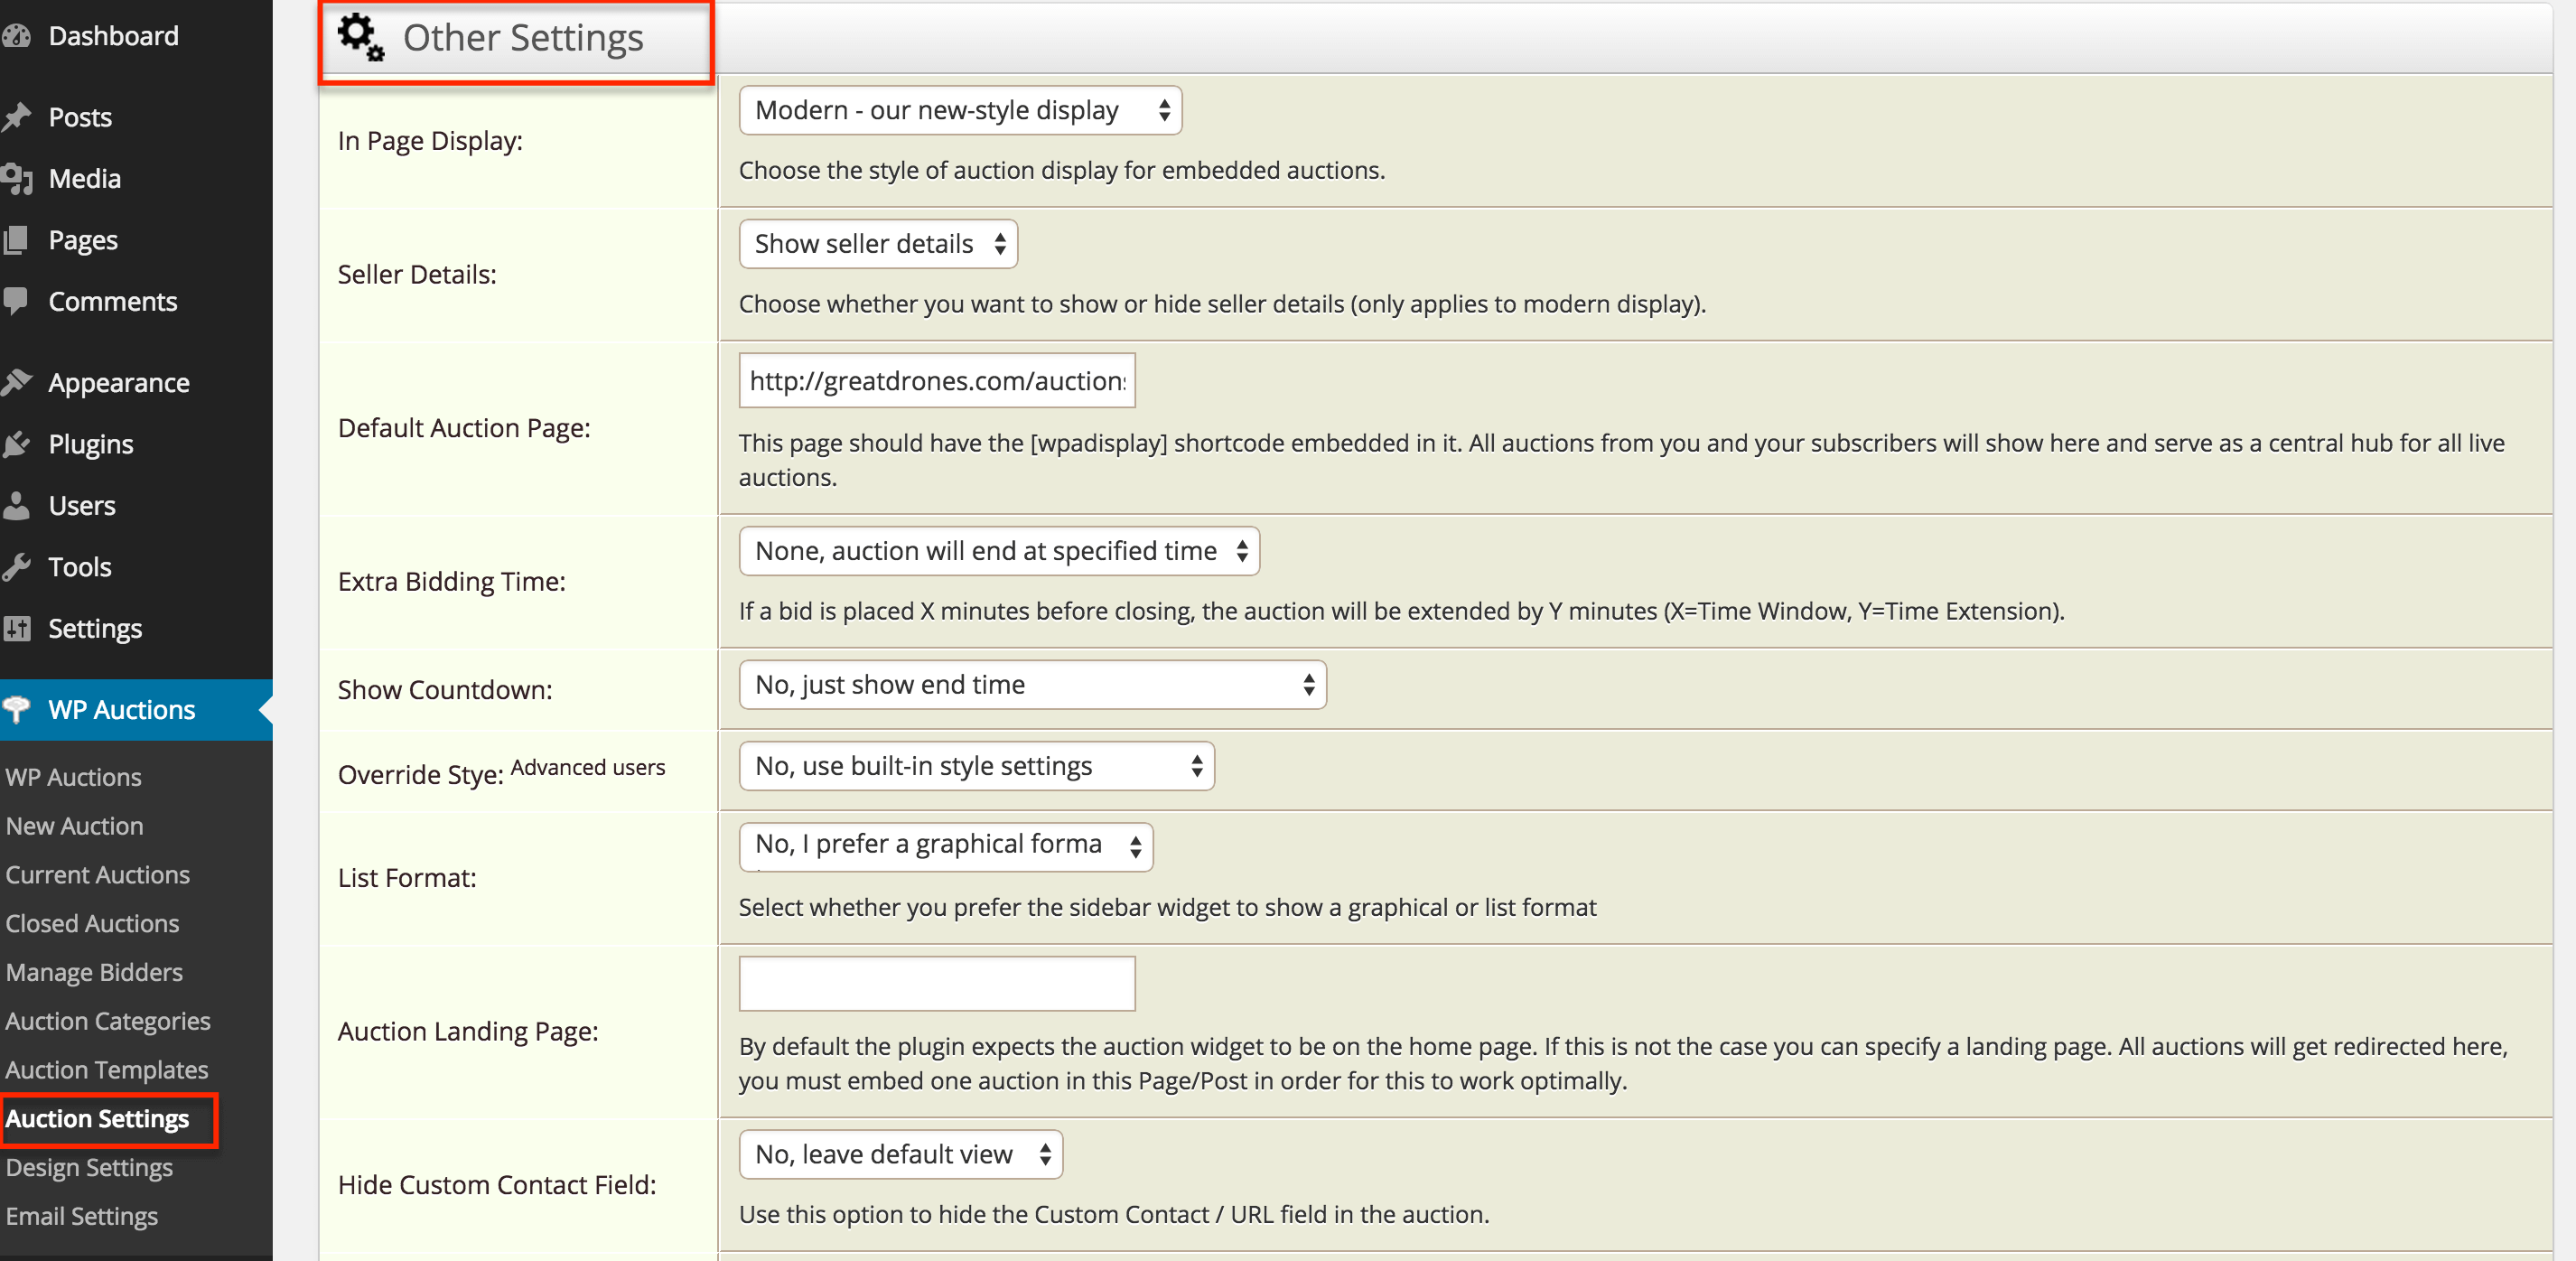
Note the setting for Default Auction Page. You’ll do the same process as the payments page earlier. Head to Pages → Add New Page and publish a page with [wpadisplay] in the editor. Note the URL. I recommend just naming it Auctions.
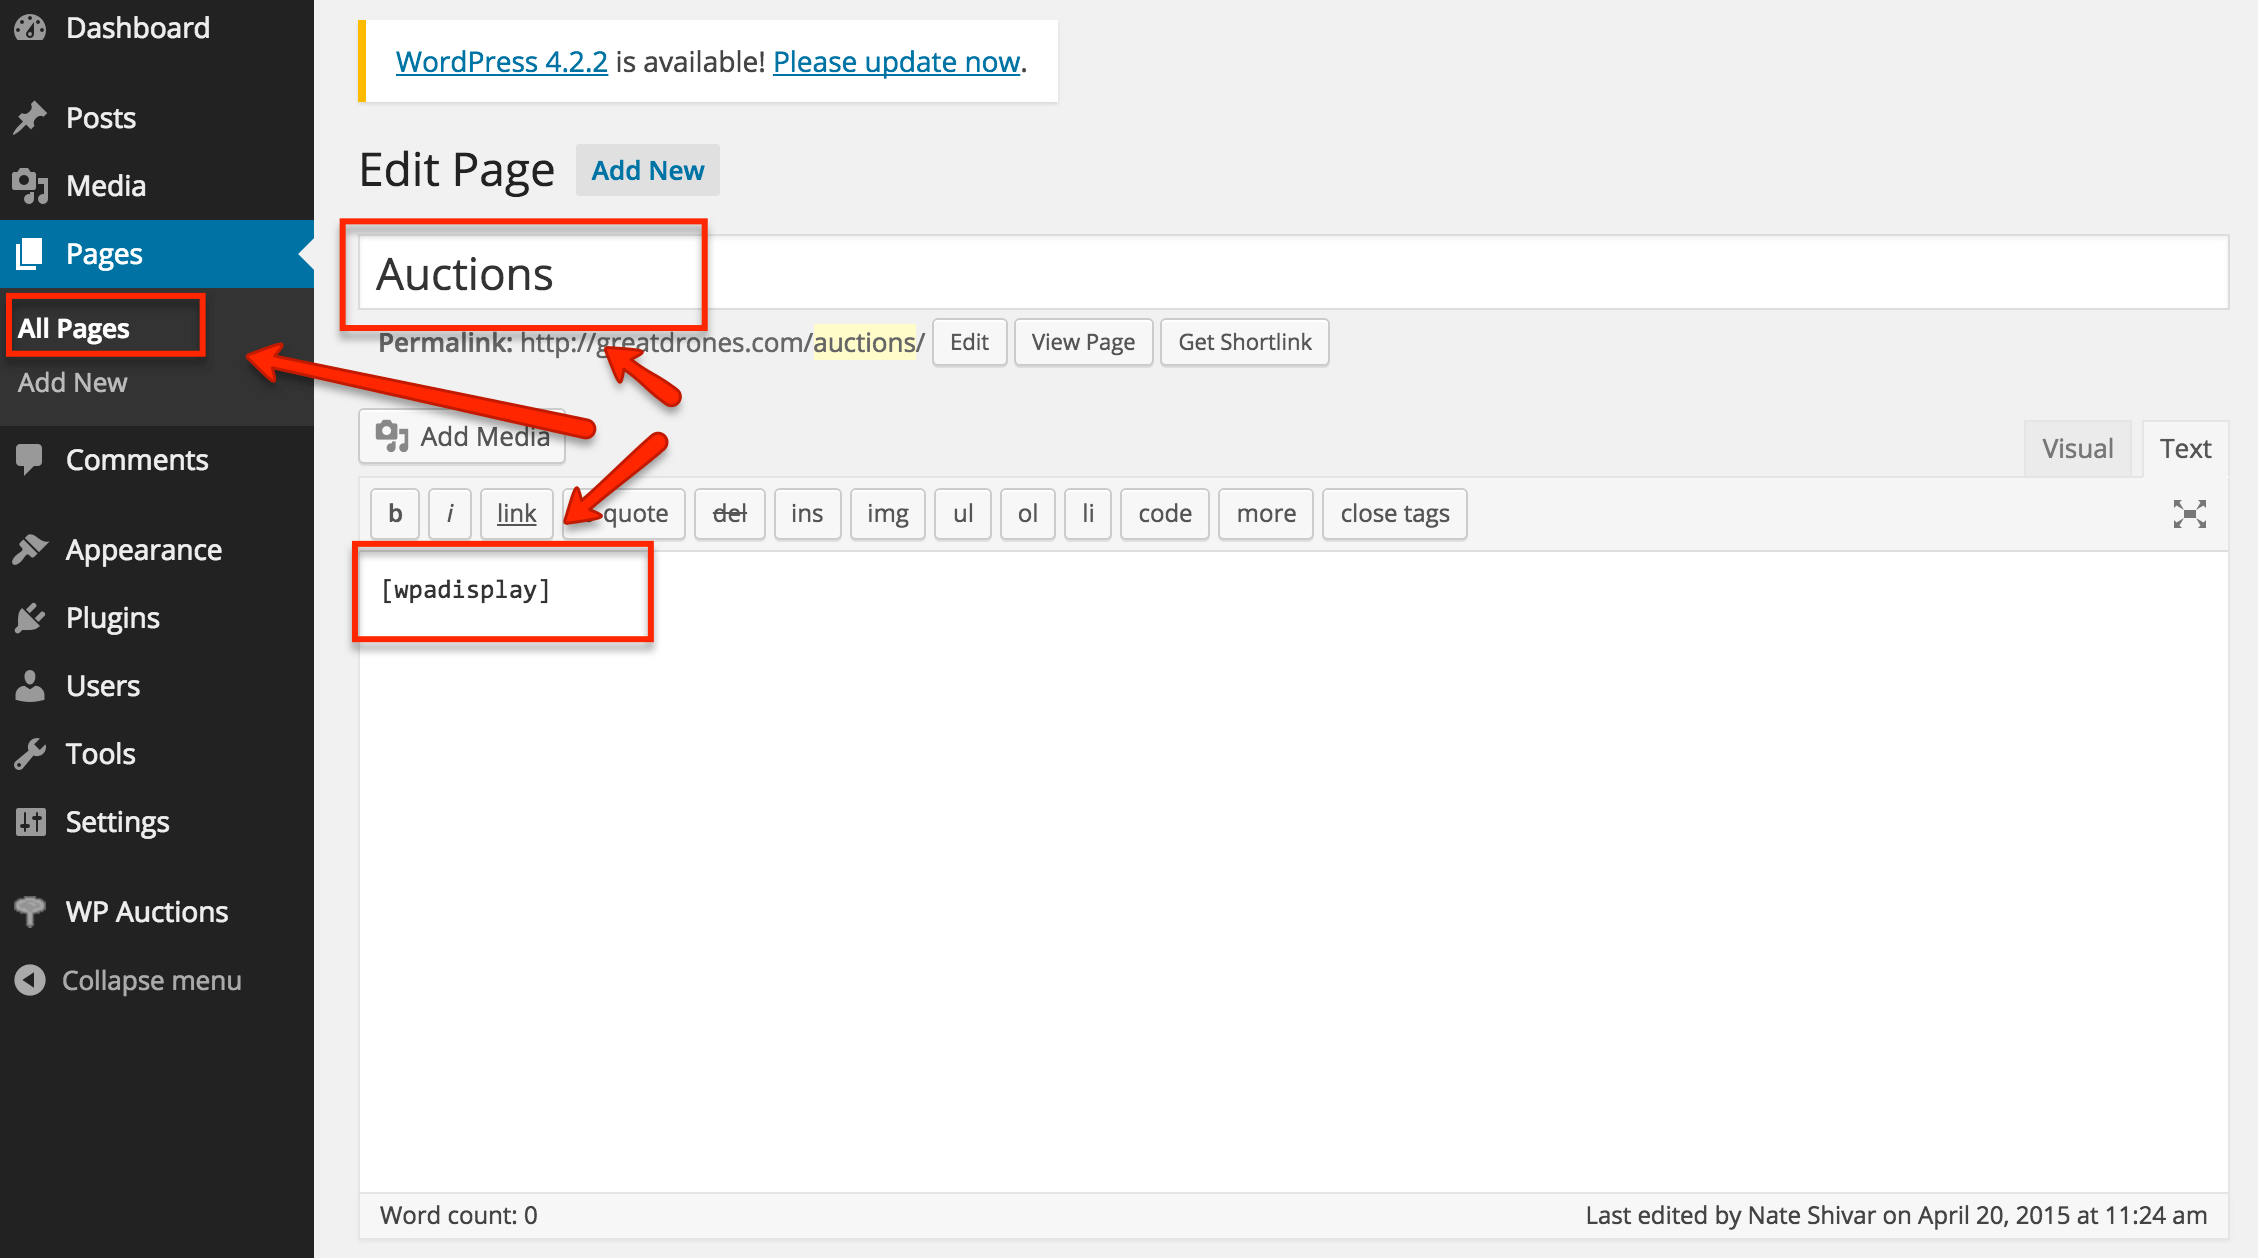
Head back to Other Settings and enter that URL beside Default Auction Page.
This page will show all your ongoing auctions. The remainder can stay default until after setting up your first auction. Review and update options.
Creating Your First Auction
Navigate to New Auctions.
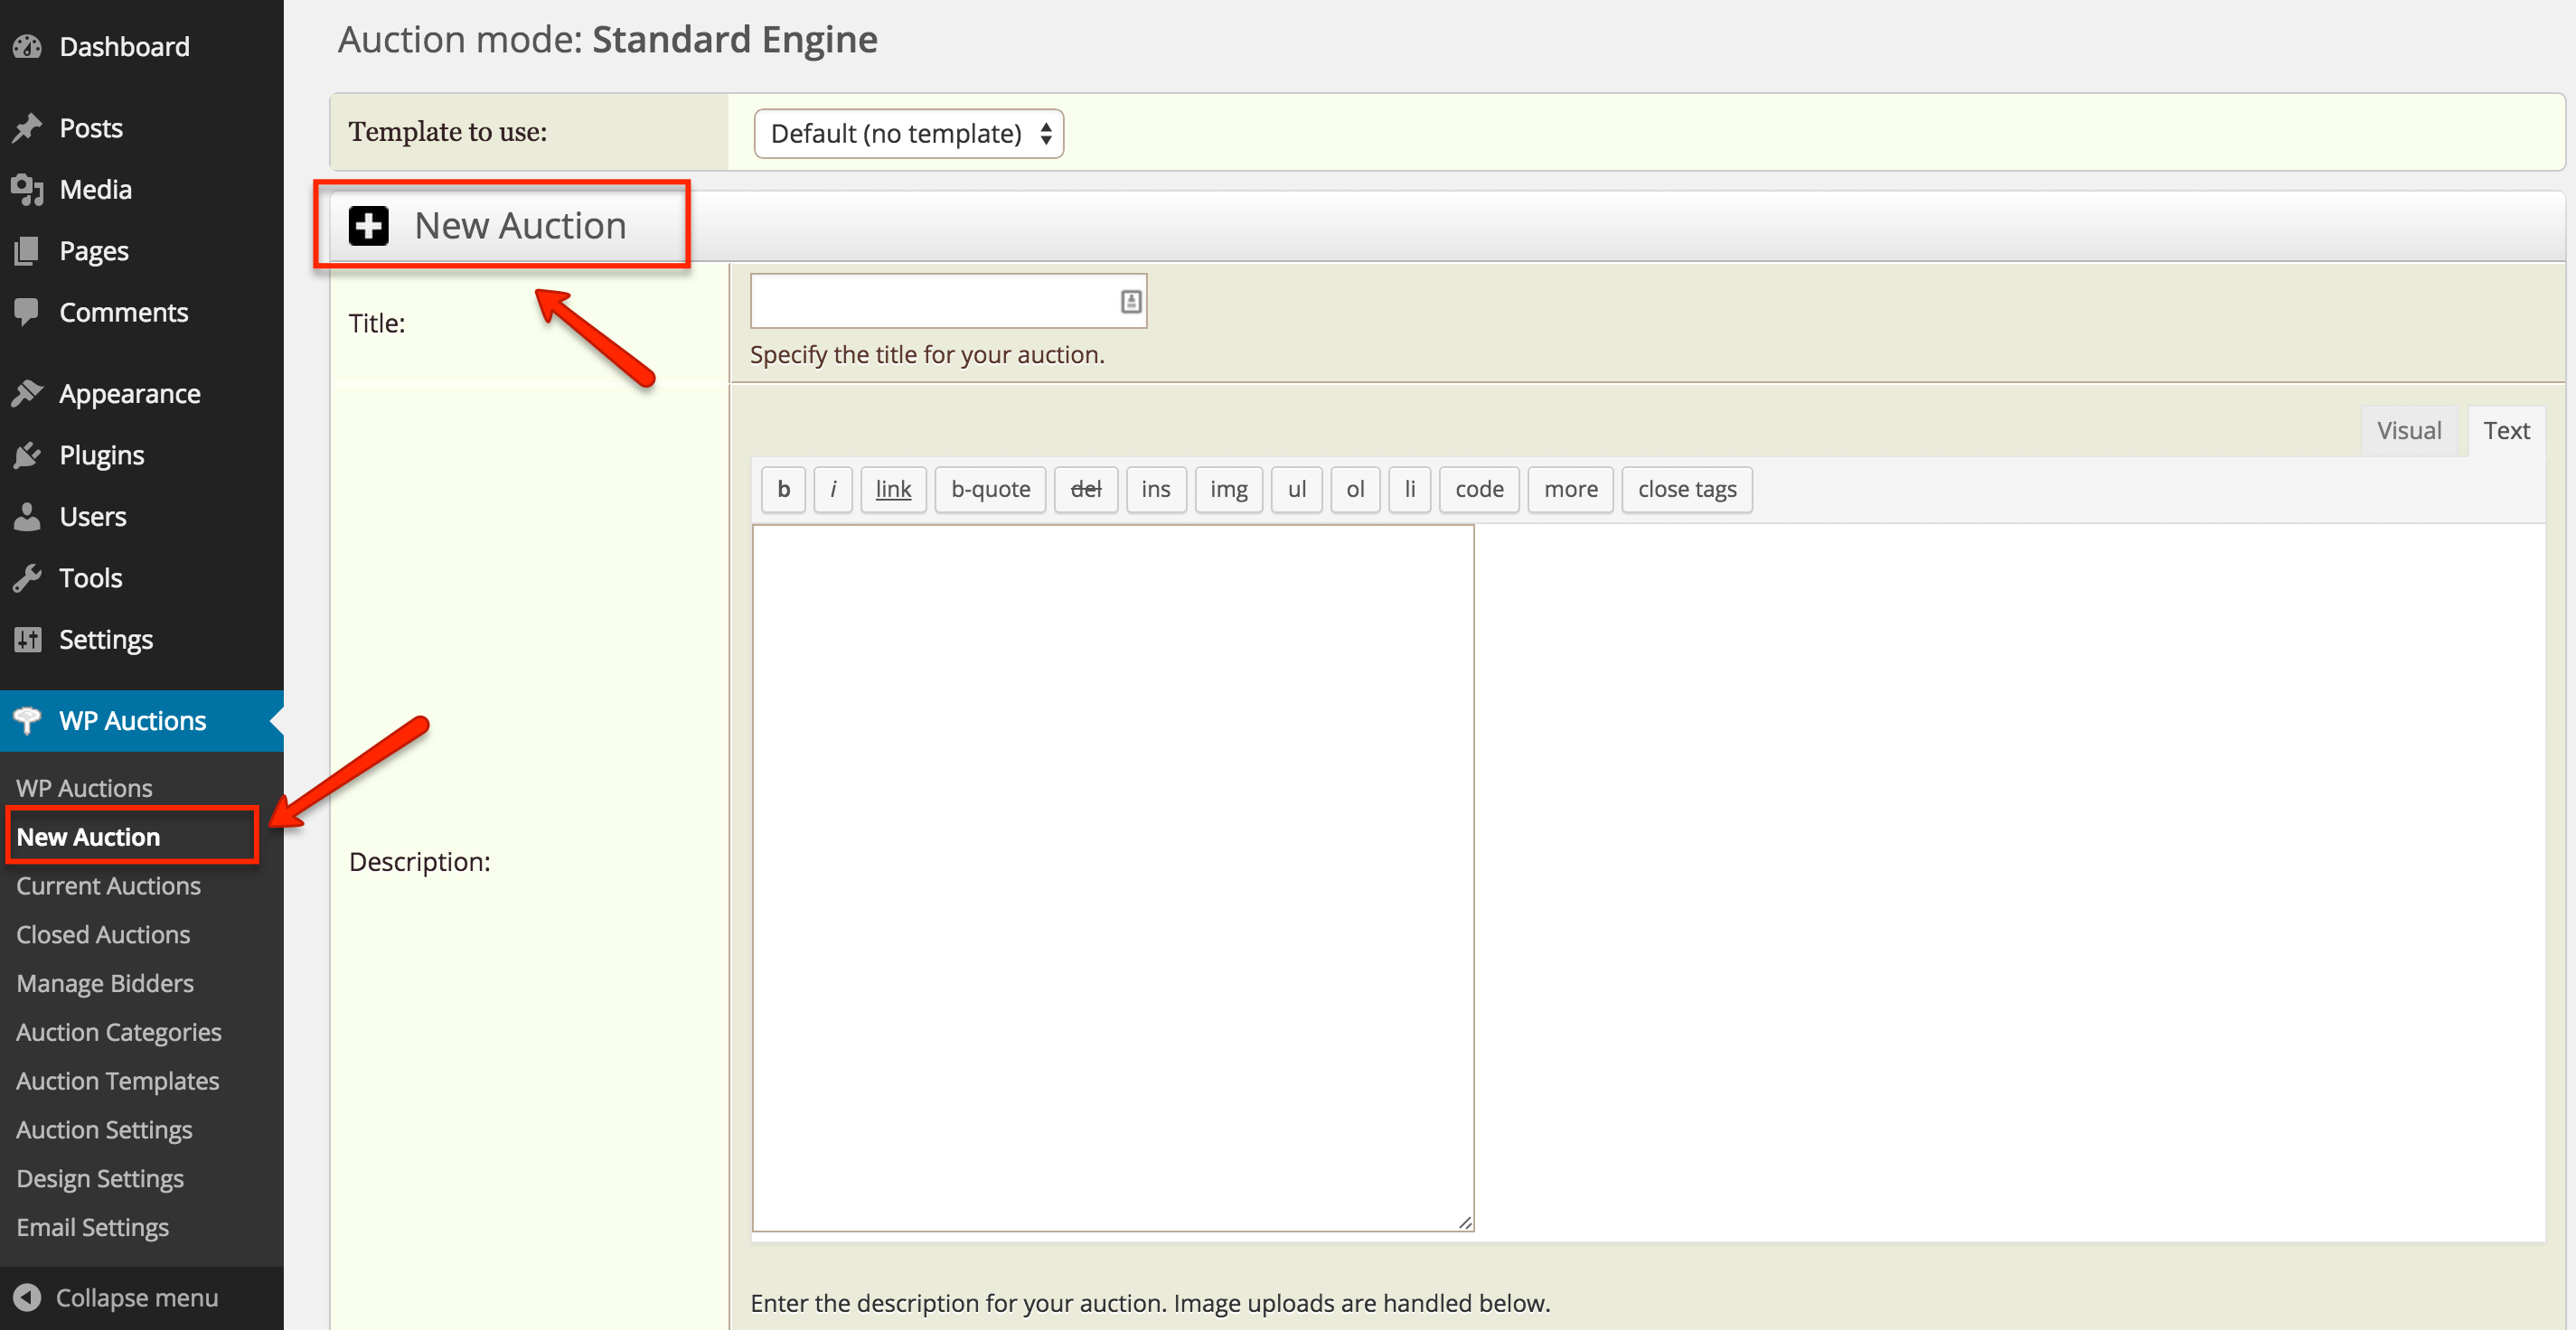
The process is very straightforward with self-explanatory fields (ie “description”) available.
There is a field for “Show Auction in AJAX Popup?” – this field makes the auction a pop up window instead of its own page within WordPress. Enable this option if you don’t want a page dedicated to each auction, and would prefer to simply have all auctions accessible and functional from a single page. Otherwise, leave it set to No, and we’ll set a post up with the auction after saving.
Finish Shipping options, then finish Other options, which includes options for Reserve price and Buy It Now.
After Updating Options, navigate to the WordPress Dashboard to create a new Post (if you want it to appear in a blog) or a new Page (if you want it to be stand alone linked from somewhere, such as the Auctions page).
Underneath the main editor for your new post, there should be a meta box for Inserting an Auction.
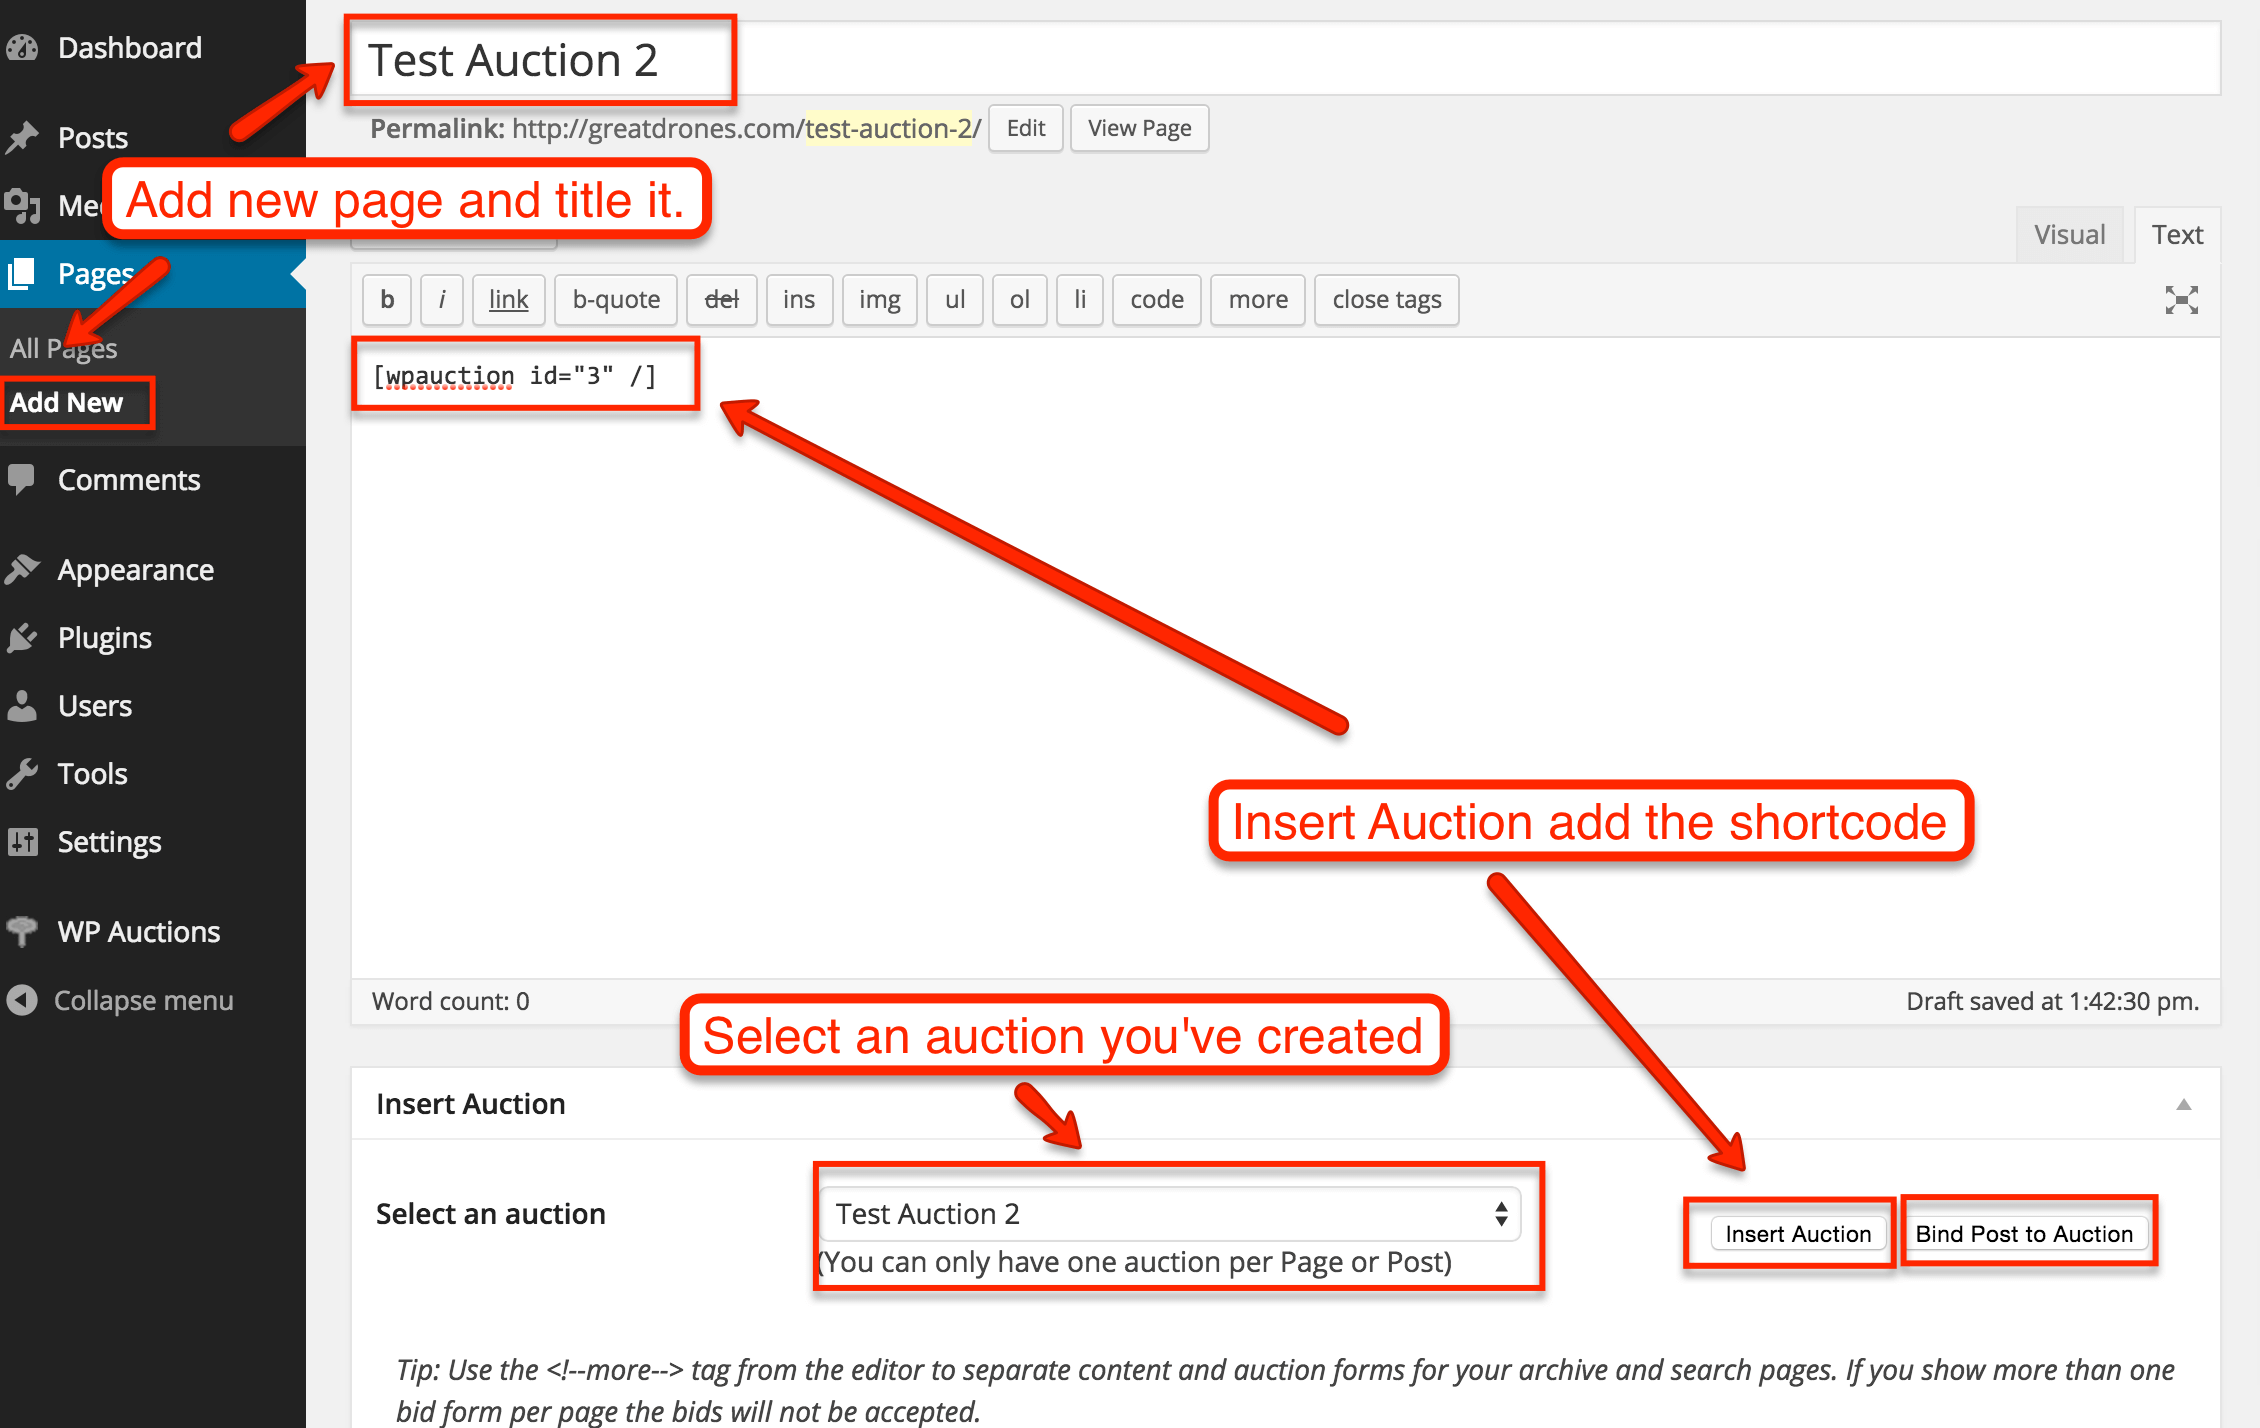
Select the auction to insert, and click Insert Auction. You can also click Bind Post to Auction. This is a handy function that attaches the auction to that specific post. Everywhere your auction appears (ie, notification emails, within WordPress backend, etc) will be attached to that auction, so you can edit them at once.
It also makes it easy to add many auctions at quickly. In the auction settings under WP Auctions, you’ll see that an post that has been binded to an auction will now automatically show up in the auction settings.
Congratulations – you now have an active auction on your website! That is the basic functionality to set up an auction/marketplace style website like eBay.
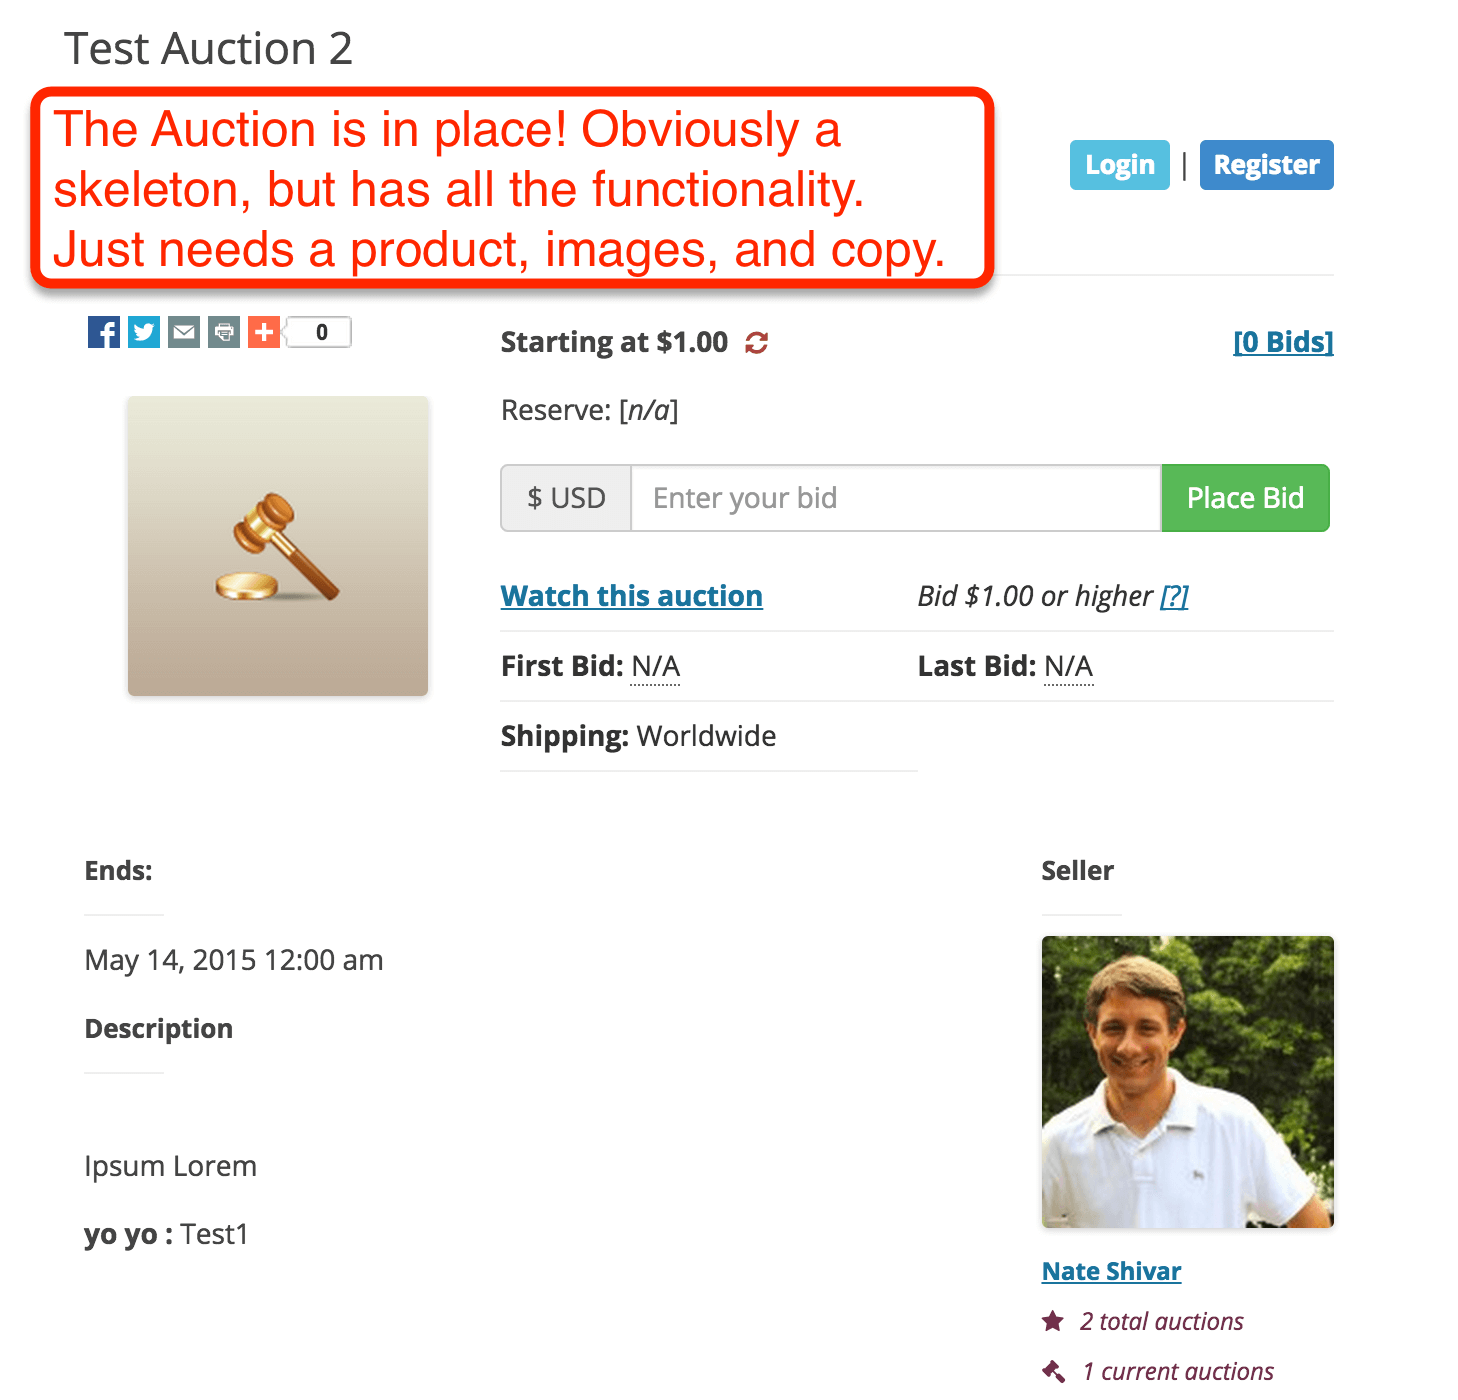
The loose ends that need to addressed are design and user experience.
WP Auctions has a Templates option if you are listing many versions of the same product. It has Design Settings that you can adjust to fit the design of your website. And it has optional Email Settings to customize your bidders’ experience.
Taking It Further
What’s cool about WordPress plugins is that you can extend even plugins and make them do exactly what you want them to do.
User Submissions
By default, WP Auctions also allows anyone who registers on your website as a Subscriber to create new auctions. This function replicates how eBay works and allows you to grow your own true marketplace / auction website.
Bulk Upload
If you want to scale out your listings, WP Auctions has straightforward database tables so it will work with a free uploader like Really Simple CSV. They also sell their own native Bulk Uploader.
More Resources
WP Auctions has further resources on building out your auction site here.
If you need to take a step back and learn more about WordPress, check out my Beginner’s Guide To WordPress.
Next Steps
- Follow my WordPress Website Setup Guide to get your domain name, hosting and WordPress installed.
- Purchase and install WP Auctions plugin for WordPress.
- Configure initial settings and set up a test auction.
- Launch your first auction and congratulations!
- Continue building out and adding to your website.