This is part of the Beginner’s Guide To WordPress Series. In this post, I’ll cover how to use the WordPress Visual Editor edit your site quickly and efficiently.
If you wanted to update your website way back when – you had to edit in computer code (with HTML). But nowadays software like WordPress makes editing your site as easy as writing an email.
The Visual Editor is what you use to actually write and edit your content in WordPress.com hosted blogging software. It’s very similar to Word and other processors – here’s a tutorial on how to use it.
The Toolbar
Let’s take a look at all the icons in the Visual Editor Toolbar located below the Title, starting with the first row.
- The first icon is a styling drop down menu for adjusting the style of your post content.
- The B – the bold icon. Clicking on this will make your text bold.
- The I – represents italics. Clicking on this will italicize your text.
- Bullet List – creates an unordered or bulleted list
- 123 list – a numbered ordered list.
- The “quote” icon – creates a block quote. Highlight your text and click the block quote icon, and it will do the indentation for you.
- The following three icons represent alignment. Use these to align left, center your text, or align right.
- The link and unlink icons allow you to link and unlink your text to another page and post on your website or to an external website.
- The insert more tool allows you to create a break in the page to give a shorter preview in your post listings. This tool may or may not affect your site depending on the way your theme functions.
- The toolbar toggle icon reveals/hides the second row of tools for editing and formatting your content
- The full screen icon allows you to edit or create your content without distractions by eliminating the sidebar and all other modules..
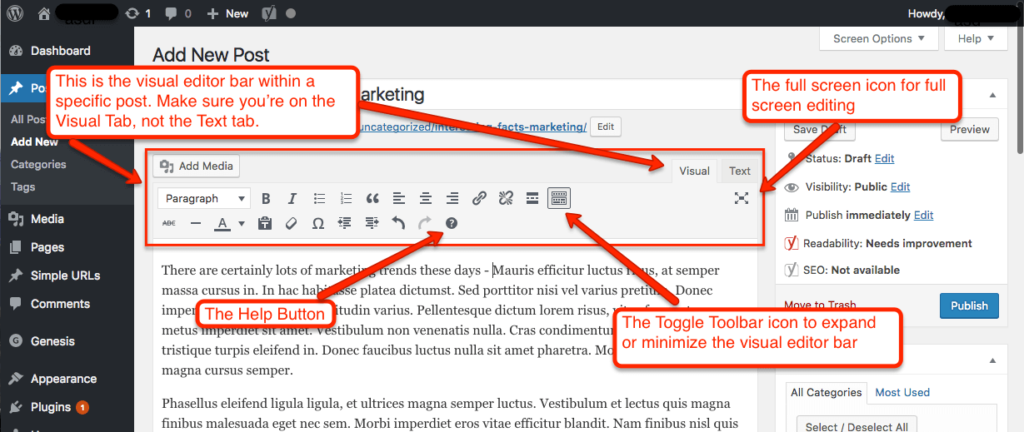
Alright – let’s take a look at the second row.
ABC– the strike-through icon. This is typically used to show errors or changes made to your post.- The “dash” will insert a horizontal line wherever your cursor is when you click.
- A with the drop-down menu – allows you to change the color of your text.
- The Clipboard T – paste plain text box inserts text from another text editor and removes any formatting that may have occurred in the other editor.
- Eraser – The tool that removes formatting from a targeted group of text.
- Omega – use this to insert a custom character such as the copyright sign and the trademark sign by selecting it from the list.
- Outdent & Indent – use this to outdent or indent your text.
- Left arrow – undo an action
- Right arrow – redo an action
- Question Mark – a visual editor help menu to help answer any questions you may have about the visual editor.
Editing Text
The page and post text editor are functionally the same, so the information provided in this tutorial can be applied to editing the content of both pages and posts.
Begin by clicking on either the Pages or Posts button in the dashboard. Then click on either the title of the post you would like to edit or hover over the post and click edit in the action menu.
To add text to the page or post, click where you would like the text to be entered and a cursor will appear. Then begin typing. If you want to add any formatting options, just highlight the text you want formatted and click the appropriate icon in the visual editor toolbar.
For example, to make your text bold, highlight the word or words you would like bolded and then click the bold button in the text editor toolbar.
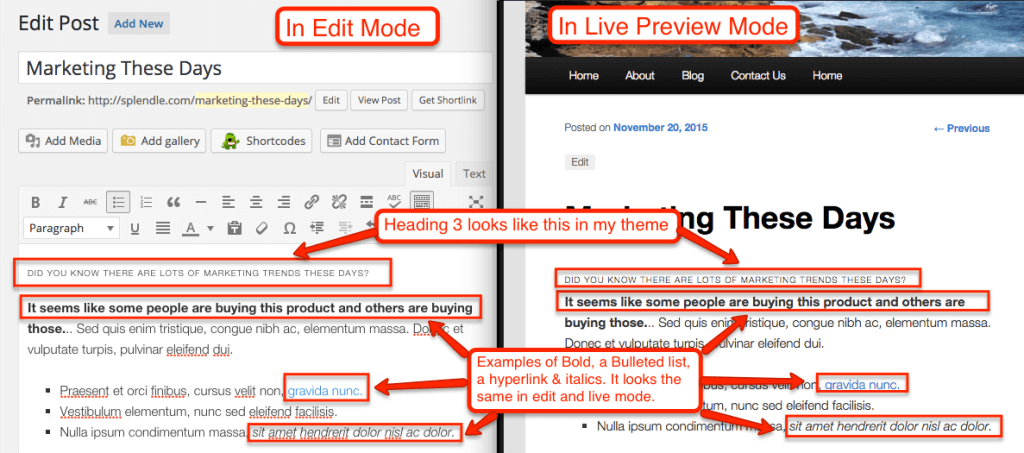
The editor will give you a general idea of what your post or page will look like. But to see exactly what your page will look like before being published, click the Preview button or click Publish and your content will be added to your site immediately.
Adding Paragraphs
Now let’s explore how to add a paragraph using the style options from the toolbar. First, be sure you are using the visual editor by clicking on the tab labeled Visual at the top right of the text editor.
Then make sure the full toolbar is exposed by clicking on the Toolbar Toggle icon in the toolbar. The styling options will be revealed as a dropdown menu on the far left of the toolbar.
Highlight the text you would like to make into a paragraph and then select Paragraph from the styling options. From the editor mode, click Preview to preview the page before publishing or click Publish to go live with the content immediately.
Add Heading
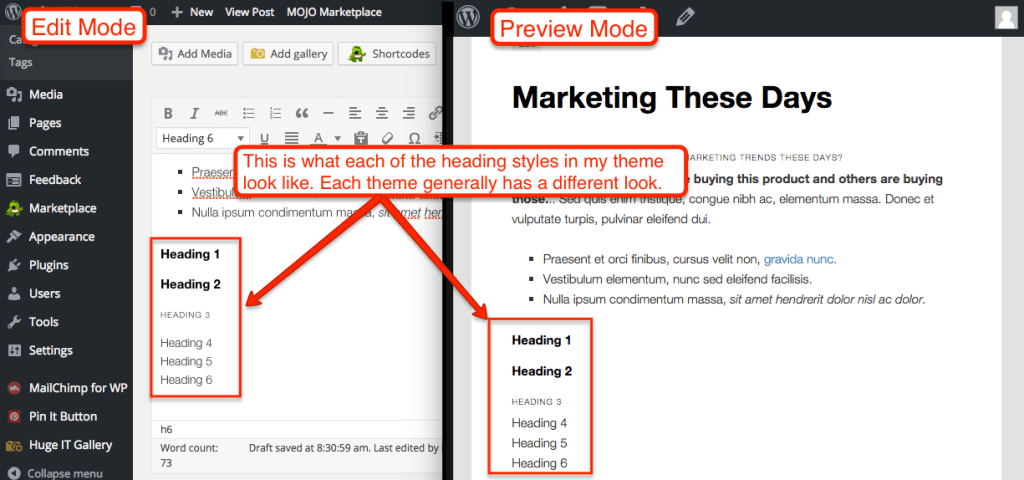
Heading styles not only give your viewers a better visual representation of what the important points of your posts or pages really are, they also help search engines determine the important content on your site and helping improve your visibility.
To create headings, make sure the post editor is showing the second row of formatting options by clicking the show kitchen sink button at the top right of the content toolbar.
From here, you will see that the default styling is Paragraph. Highlight the text you would like to modify, and then use the drop-down menu to select a different style.
By default, WordPress offers six different heading styles for highlighting points in your content or for separating topics on the same page. Heading one is usually the largest and most important, incrementally scaling down for each of the following headings. When your content is formatted as you would like it to appear on your site, remember to save or publish your content.
Hyperlinks
Hyperlinks give you the ability to link a word or a group of words to another page or post on your site or to any other page on the web.
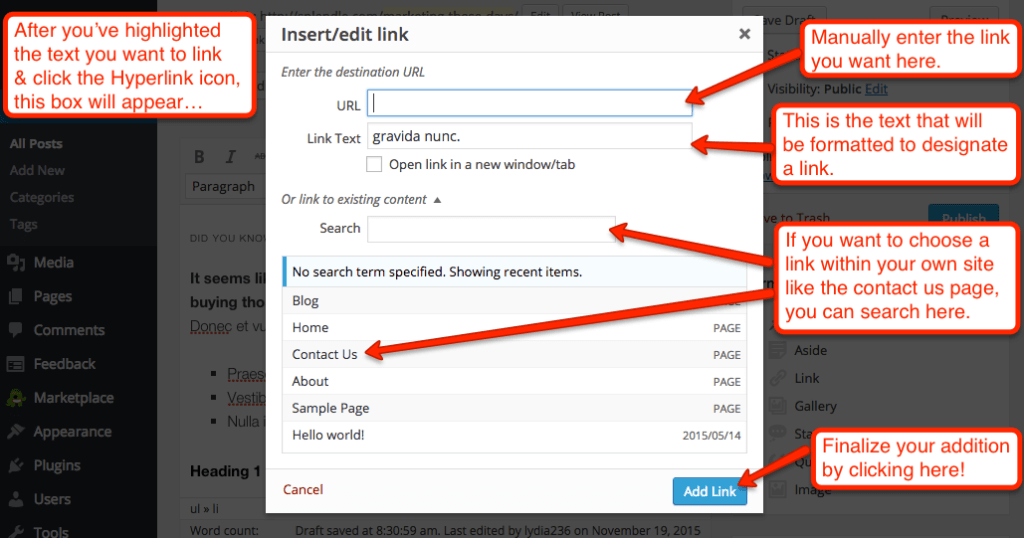
To create a hyperlink from the text editor, highlight the word or words you would like to link from and click the Create or Edit Link icon in the toolbar. A popup dialogue box will appear asking for you to first enter the page URL you would like to link to. Simply paste in or type the web address you would like your visitors to be redirected to when clicking the link. The title can be used to give more information about the link when it is hovered over.
The check box below the title gives you the option to either have the page open in the current window or tab that your user is in, or to open a new tab. Below this are a few options for entering a page to link to from your website.
If you are linking to a page or post within your own website, navigate down to the search box. In the Search box, you can begin typing the title of the page or post you would like to link to, and a list of pages will populate for you to select from. Click the page or post you would like to link to, and the URL and Title fields will automatically populate.
Click the Add Link button, and the link will be added. To remove a link, simply click on the link in the text editor, and then select the Unlink icon in the toolbar. Be sure to click the Preview Changes button to preview the changes, or click Update to go live with the changes immediately.
Lists
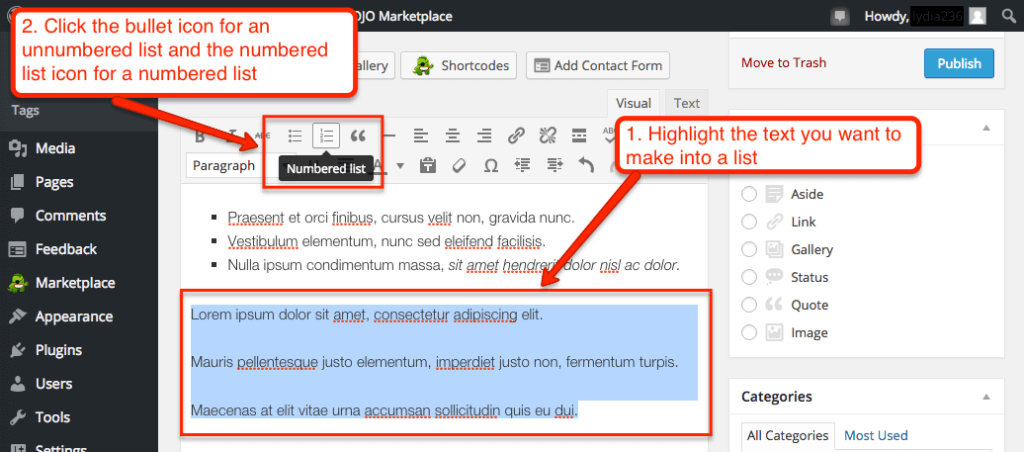
Creating lists inside of posts and pages can be very beneficial to your site. It sets content apart from the rest of the post in a form that’s easy to read – and a lot of times it is just more visually appealing.
To create an unordered or bulleted list, simply click the Bulleted List button in the formatting toolbar, begin typing the items you would like displayed in your list. Once you are finished, click the Bulleted List button again to complete the list.
To create an ordered or numbered list, click the Numbered List button, type the items you would like to include in your list. Then click the Numbered List button once more to complete the list.
Click on the Preview button to preview your changes before publishing. Or click Publish or Update to make your content live immediately.
Embed
WordPress lets you embed videos from sites like YouTube, Vimeo, Flickr, and more. To embed a video in your post simply copy and paste the video URL, and put it on its own line. WordPress will automatically recognize what it is and format the video into your post.
If you want to include a video next to a line of text, you’re going to have to write a short expression. In front of the URL, type “[” then “embed” followed by a “]”. Then type your URL and type “[” with “/embed” followed by a “]”
Like this:
This tells WordPress that it’s a video, and not some random text. Some sites have customizable embed tags that give you more control over how the link is shown in your post. Copy this, and go to the Text tab in your editor, and paste the code where you would like the content to be seen.
When you are done, hit Preview to preview the post. Click Update or Publish to finalize your post and make it public.
Next Steps
The great thing about WordPress Visual Editor is that the code is built in, so it’s super easy to create a post just like you want it. Don’t be afraid to play around with it! Open up a draft post and do all sorts of changing and editing until you feel comfortable with the visual editor.
Then, check out how to use the Media library to add images and videos to your post.
- How To Use The WordPress Dashboard
- How To Create A Post In WordPress
- How To Create And Edit Pages In WordPress
- How To Use WordPress Categories And Tags
- How To Use The WordPress Visual Editor
- How To Add Images To The WordPress Media Library
- How To Add Images in WordPress
- How To Edit Menus In WordPress
- How To Add Widgets In WordPress
- How To Change A WordPress Theme
- How To Add A Plugin To WordPress
- How To Update WordPress
- The Best WordPress Plugins

