If you’re one of the nearly 2 billion people in the world with a Gmail account, making your own website could be just a few clicks away. That’s because the big Google offers a website builder, Google Sites, alongside their free web-based tools. And just like their office suite of products, Google Sites is perfect for building quick, simple, easy to publish projects.
In this guide, I’ll be taking you through the same step-by-step process I use for making a project with Google Sites. Together, we’ll make a fully functional website that could be for personal, professional, or academic use. Then, we’ll take a closer look at Google Sites’ other templates, as well as alternative website builders for more involved projects.
Your First Project With Google Sites: Step By Step Instructions
With an hour or two to spare and 10 simple steps, you can have your first project with Google Sites up and running. For this demonstration, I’m going to be making a page from scratch, that you might use to present a project for your job or school. And I’ll be using the latest version (new Google Site), too — so don’t switch to classic Google Site mode if you’re given the option.
Sign into your Google account, and let’s get started building a new site!
Step 1: Open Google Sites
First things first: You’ll need to navigate over to Google Sites! Easy peasy.
Step 2: Open the Google Sites Support Page, Too
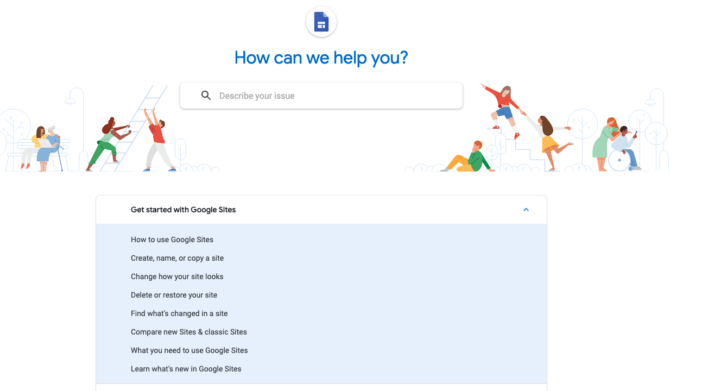
In a separate tab on your browser, open up Google’s support page for Sites. This is a searchable database of common questions and issues that might come up when you’re using Sites, making it an indispensable help.
And since it’s curated by Google, this support page has clear, direct answers to any basic question that might come up along the way.
Step 3: Start Your Website
Click on the big “+” icon in the upper left of the Google Sites main page (the one that says “Blank” underneath it). This will open up a stock template for your very first Google Sites website.
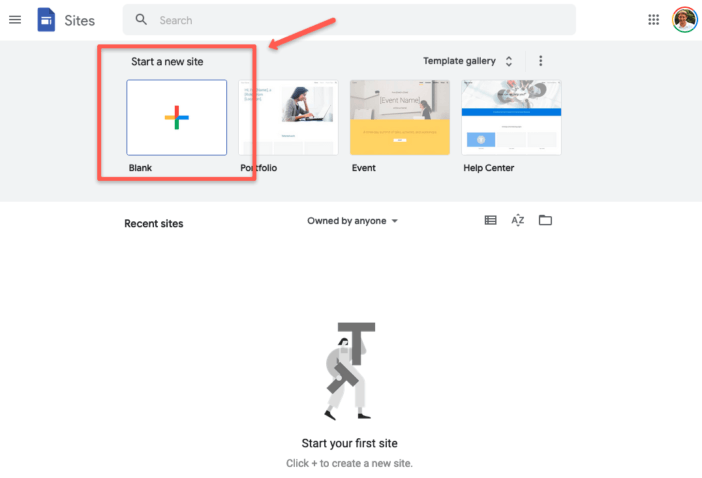
While you’re there, take a moment to look around and familiarize yourself with the menus and sidebars. You’ll be using all of them later to customize, save changes, publish your site, and more.
Step 4: Choose A Name For Your Website
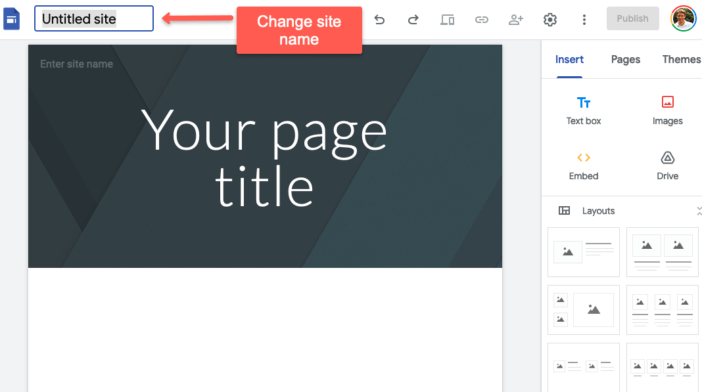
What’s a good website without a name? In the upper left corner of your browser, you’ll see a text box with the words “Untitled site”. Click on it, and you can edit the name. This is the name that your website will be saved under on your Google Drive, and you can amend it later if you change your mind.
Step 5: Choose A Theme
Near the top of the right sidebar, you’ll see three options: Insert, Pages, and Themes. Go ahead and click on Themes.
This will pull up six stock themes from Google, each with a fitting name: Simple, Aristotle, Diplomat, Vision, Level, and Impression.
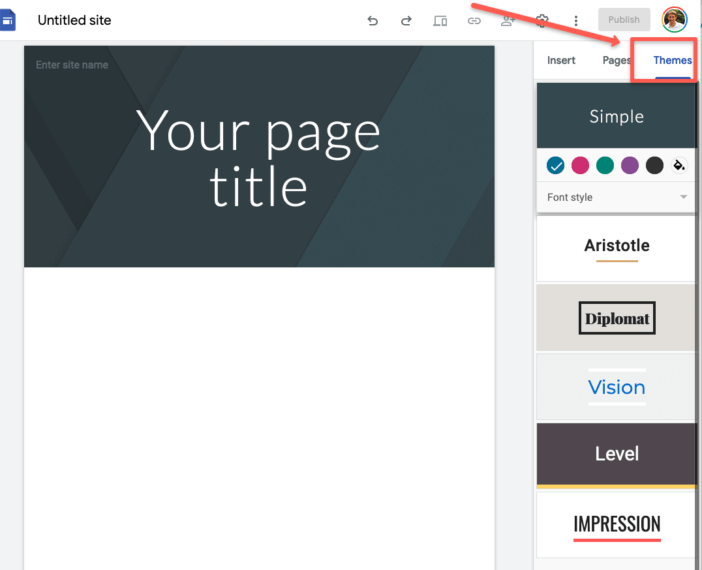
Each theme is a combination of a typeface, a selection of colors, and a few graphic design elements. Try clicking on them one by one, and seeing how it changes your new webpage. For now, don’t overthink it: Just go for the one that catches your eye the most.
When you’ve found a theme that you like the looks of, try adjusting its colors using the drop-down menu under the name of the theme. You’ll have the option of five pre-selected color templates to choose from, but you can also click the paint bucket icon (to the right of the fifth color) to pick a custom color scheme.
Each theme also has three font styles to choose from, in a drop-down menu under the color choices. Click on that, and try out all three to see which one fits your mood and your style. There are no wrong choices here, and you can always go back to adjust any of these settings later.
Step 6: Change the Layout, Then Add Text and Images
Now it’s time to use another option from the right-hand sidebar: Insert.
This is where you’ll do the majority of the actual “building” for your new website, including changing the layout, text, and images. It’s also where we get into the widest range of options to choose from. Remember when I said to keep that Google Sites support page open? It can really come in handy here.
First, let’s go ahead and change the text that’s already on your screen that says “Your Page Title”. Click anywhere on the text, and you’ll see a blue box surround it as well as a toolbar pop up above it. Use the backspace key to erase the text, and replace it with “My First Project” instead.
Next, let’s go ahead and add a block underneath what’s already there. You know, to make it start looking like a real webpage! Under the Layouts section of your right sidebar, click on the first one — it has a single picture of a mountain. This will add a blank template underneath your the main header that’s already there.
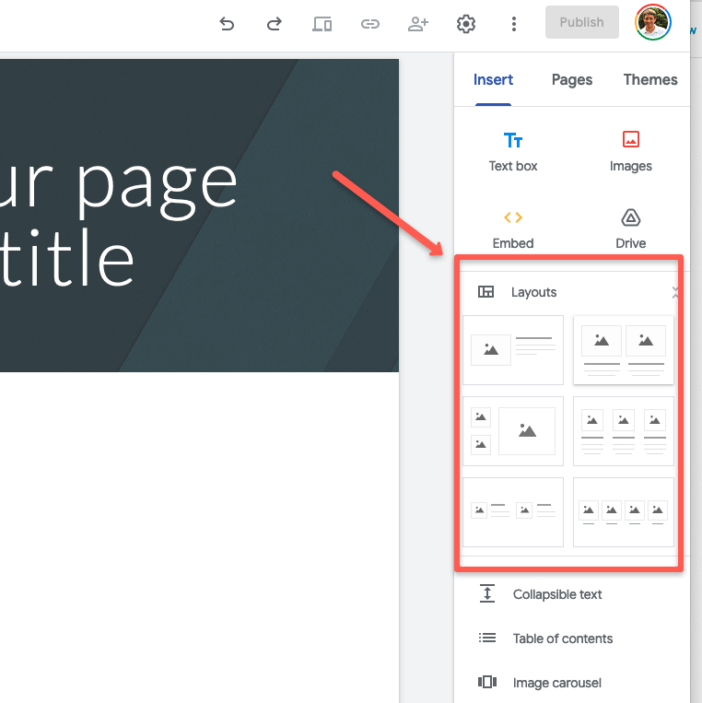
See the box inside there that has a “+” sign inside a circle? Click on that plus sign, and we’ll add an image. When a menu with Upload, Select Image, and From Drive pops up, click on Select Image.
This will bring up another dialogue box, with four options near the top: Google Drive, By URL, Google Image Search, and Photos. Assuming you don’t have a photo already in mind, let’s click on Google Image Search.
Search for your favorite animal — I chose a duck — and find an image that you like. Click on it, and a blue bar will show up beneath it. Click Insert, and the image will be loaded from Google Images right into your webpage. If the whole image isn’t showing up, scroll over it and grab one of the blue balls that show up at the corner. Click and hold, and you’ll be able to drag the image into shape.
Lastly, add a few facts about your favorite animal. Click on the text boxes to the right of the image, and you’ll do the same thing as you did for the header in the first step.
Step 7: Add More Pages
At this point, you’ve made the bare bones of your first fully functioning web page. Congrats! But for it to be a true blue website, you’ll need to add a few more pages.
Head back over to the trusty right-hand sidebar, and click on the last option we haven’t used yet: Pages.
What shows up will be… Almost blank. We do only have one page for our site, after all.
To fix that, look down a bit and find the blue “+” sign nested inside of a white circle. Click on it to add another page, and you’ll be asked to give this page a new name (I chose “More Animal Facts”).
And boom! You’re back to the start of another page that looks eerily similar to the one you started working on moments ago. Navigate to the Insert section of the right-hand sidebar, and you can follow through the directions in step 6 again on this new page.
At this point, I’d recommend playing around with a few different layout options. If you insert one that you don’t like the looks over, just hover over it and look for the trash can option that shows up to its left. That’s the delete key for anything you don’t want on your page anymore.
This is also where you can really start getting into Google Sites. Scroll down further in the Insert section, and you’ll see options for the usual trappings of a website: A table of contents, navigation menu, dividers, image carousel, placeholders, even an option to insert a YouTube video directly into your site. All of these functions are covered in detail on this page of the Google Sites support manual.
And what if you want to make a few more changes to your home page? Simple: Just click back to Pages on the sidebar, and then click on your homepage. This is how you’ll navigate between pages, making changes to whatever you need as you go. You’ll also notice that links to pages you’ve added will show up on the upper right corner of your homepage. Pretty neat, right?
Step 8: Publish Your Site
When you’re happy with your product and ready to call it finished for now, it’s time to publish it to the web! To do that, click on the big blue Publish button in the upper right hand corner of your screen.
This will bring up a simple dialogue box, where you can choose the web address you’d like your project to live at as well as a few custom options.
If you need something accessible, but is not a branded public project, you can just use the default domain that Google provides – sites.google.com/yourproject – it’s not super-brandable, but it works.
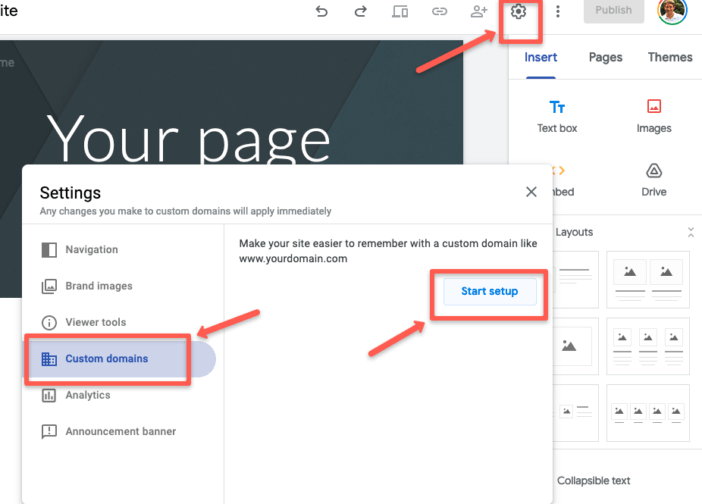
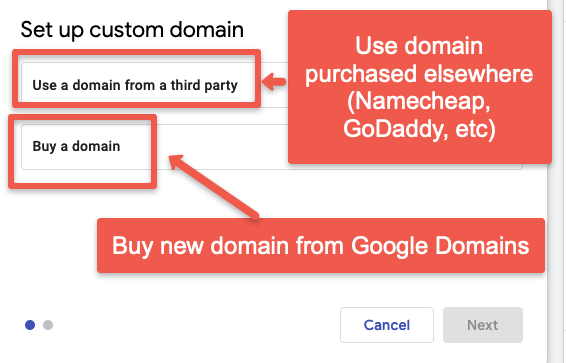
If you’re intending on using this website for real on the public Web with branding, the Manage button next to the “Custom Domain” description will let you purchase a unique website domain name from Google Domains (review) or connect it to a domain that you already own at another good registrar like Namecheap or GoDaddy. You’ll have a custom URL to share for your project.
But for the purposes of this demonstration, this site is ready to go.
Click the final “Publish” button in the lower right corner, and you’re done! Click on the arrow to the right of the large blue Publish button in the upper right hand corner of your screen, then click “view published site” to see the results of your efforts.
Using Google Sites Templates
Going through the motions from scratch is an excellent way of learning how to use every feature of Google Sites. But if you’re looking to get a webpage off the ground as quick as possible, there’s a much more direct way: Using the templates included with Google Sites.
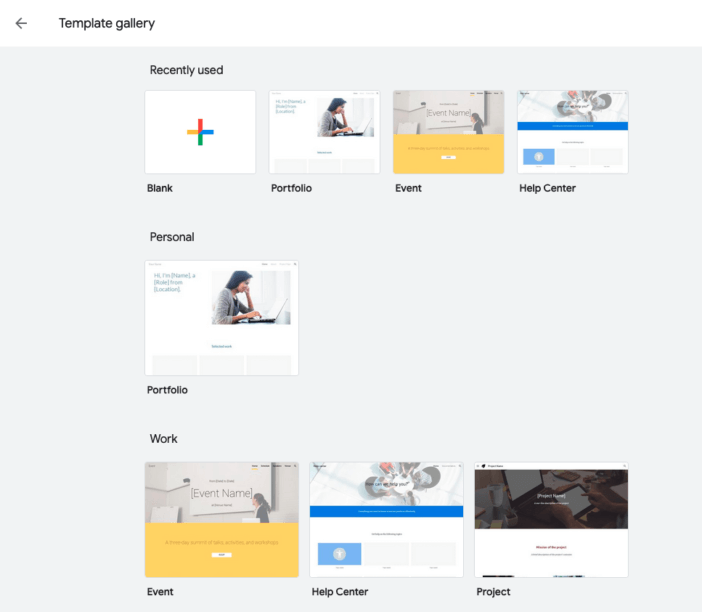
Head back to the Google Sites homepage, but this time don’t click on the “Blank” template to get started. Instead, look slightly up and to the right for the “Template Gallery” button, and click on that.
This will pull up a whole suite of ready-made sites, divided into categories like “Personal”, “Work”, “Small Business”, and “Education”. Within each category, you’ll find a variety of tailor-made options to suit your needs, whether that’s making a portfolio of your work or a gorgeous website for a restaurant.
In short: While it’s a lot of fun to make Google Sites from scratch, it’s usually faster and easier to make them from a basic template.
Tips & Tricks for Google Sites
As a parting gift, I’d like to share a few random tips and tricks I’ve picked up while working with Google Sites. In no particular order, here are 5 of my favorites:
- Google Sites works quite well with Google Classroom. If you’re an educator who uses Classroom to hand out assignments, you can link your classroom website directly through to specific pages of your Google Site to use as study aids.
- Your Google Drive is your best friend for uploading pictures and videos to your Google Site. Make a single folder with the name of your website project, and fill it with any materials you need to reference. Every image and text box’s drop-down menu has an option for uploading from Google Drive, making this the easiest way to stay organized.
- If you want to share your Google site with a limited audience, check the box for “Request public search engines to not display my site” before you finish publishing. This way, the only people that will look at your site will be whoever you give the exact web address to.
- If none of the stock templates quite fit what you’re looking for, but you don’t want to take the time to make a more complicated page, a few people sell their own custom made Google Sites templates.
- Using the Insert section of the right sidebar, you can pull charts, forms, and sheets directly from your Google docs and turn them into a quick presentation that’s akin to PowerPoint.
That’s all for today, folks! If you have any questions about Google Sites or get stuck while you’re making one, drop us a line and we’ll do our best to help out.
Be sure to also check out my Google Sites Review and my collection of real Google Sites examples and my overview of Google’s Business Email Pricing along with my guide to making a website with WordPress, and my overview of the best website builders.